
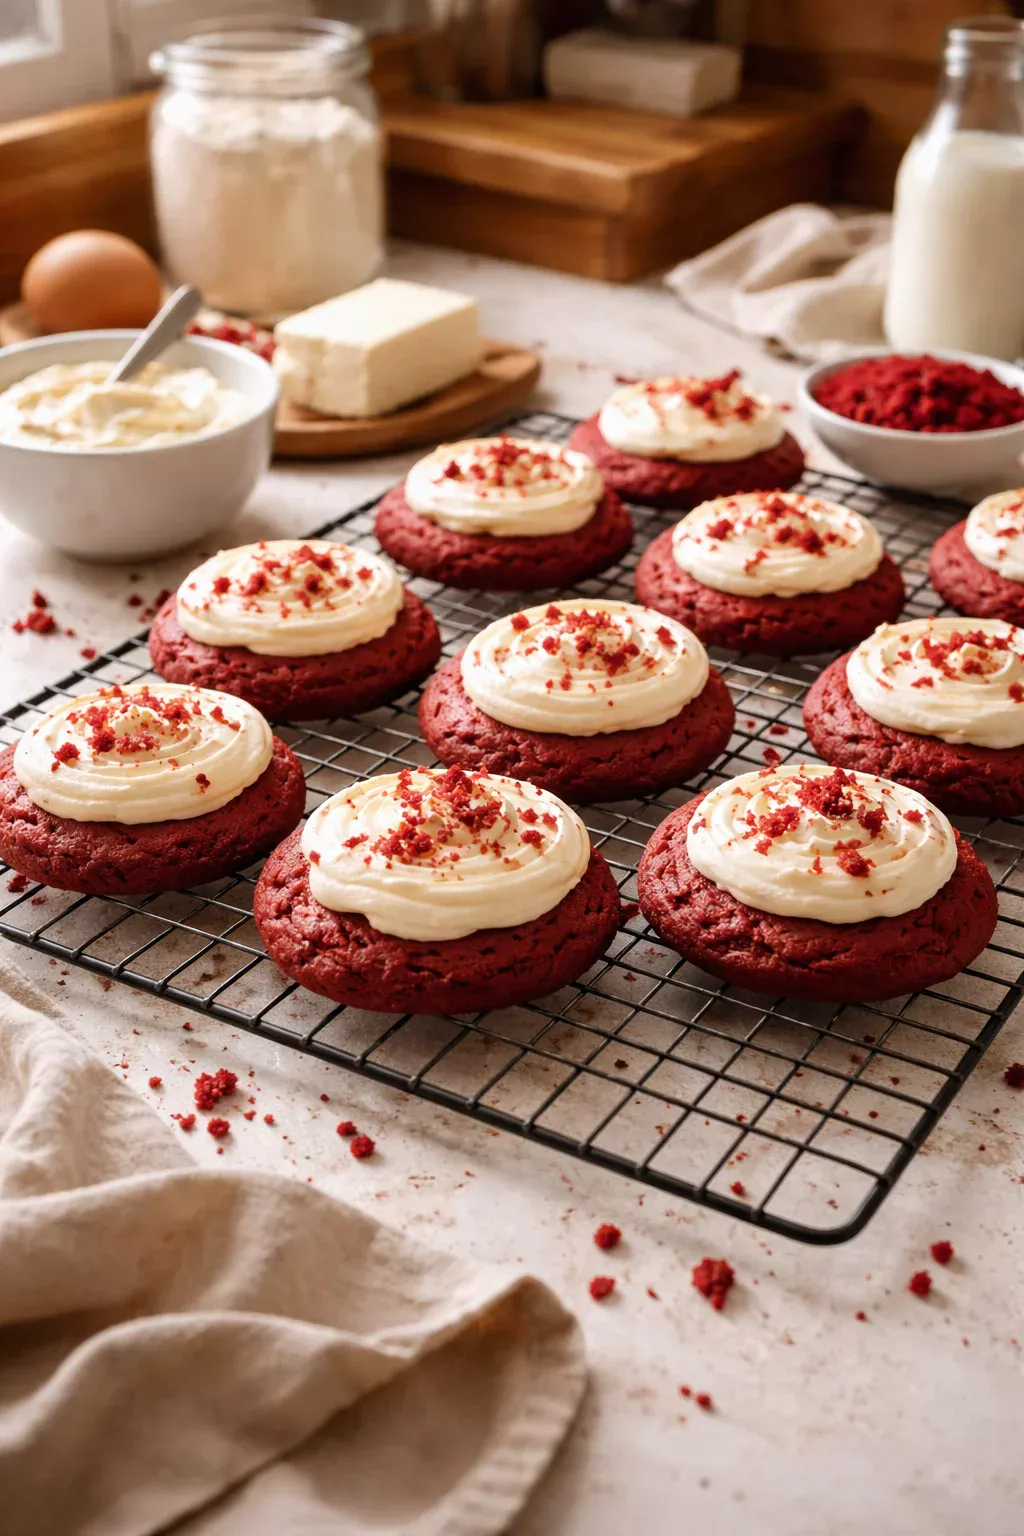
Red Velvet Cookies are what I bake when I want something that feels a little extra, but I do not want to fuss with layers of cake or a sink full of dishes. You know those days when you want a bakery style treat at home, but you also want it to be easy enough to pull off after dinner? That is exactly where these cookies live. They are soft, chocolatey, and the color alone makes people stop and stare before they even take a bite. I started making them for holidays, and then suddenly I was making them on random Tuesdays too. If you have ever wanted a cookie that feels special without being complicated, you are in the right place.
Reasons to Love Red Velvet Chocolate Chip Cookies
Let me tell you why I keep coming back to this recipe. First, the flavor is not just chocolate. It is that classic red velvet vibe: a light cocoa taste with a tiny tang that makes it interesting. Add chocolate chips and you get this rich, cozy bite that still feels balanced.
Second, they are a conversation starter. The red color is fun for Valentine’s Day, Christmas cookie trays, baby showers, and honestly, any time you want people to say, “Wait, what are those?” If you love themed treats, you might also enjoy these cute holiday style cookies like sparkle sweetheart cookies when you want something bright and sweet for sharing.
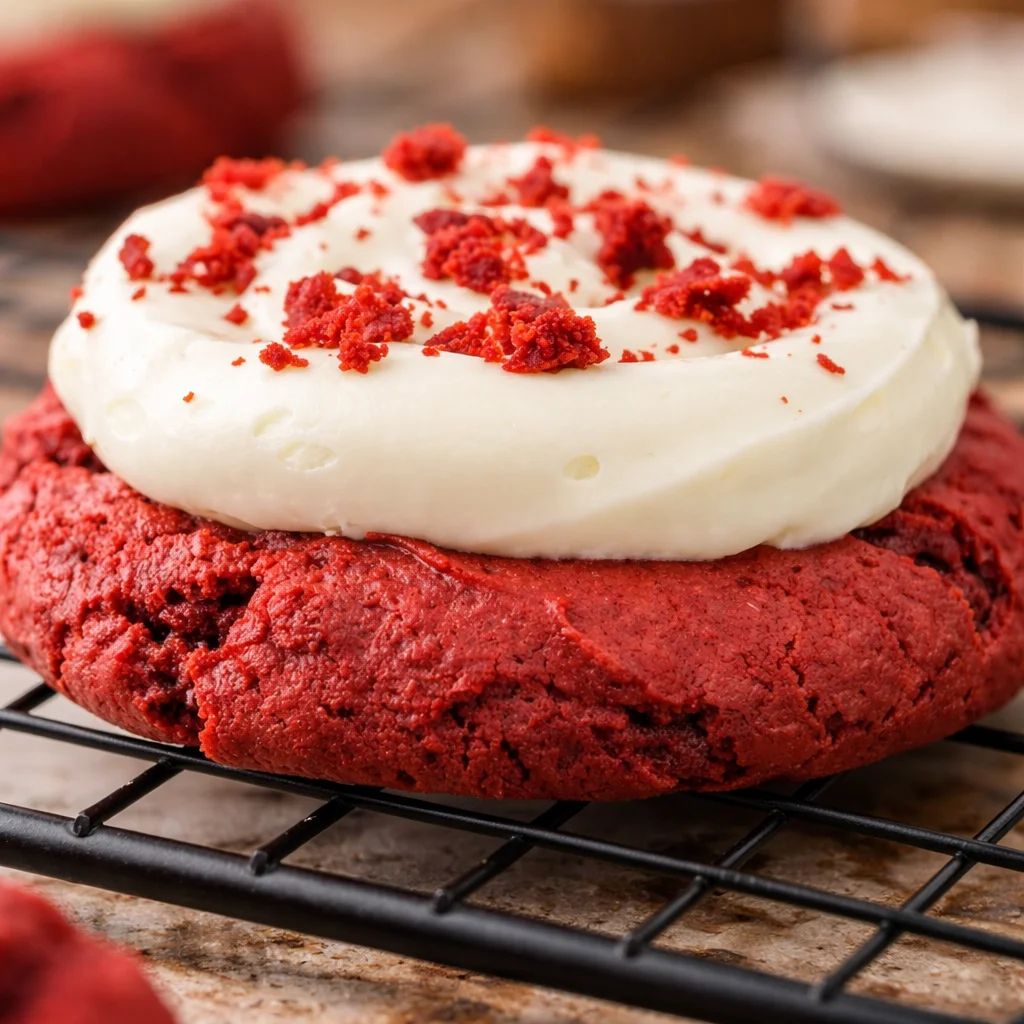
Third, the texture is exactly what I want in a cookie. Soft centers, slightly chewy edges, and those little pockets of melted chocolate. When they are warm, they are almost brownie-like inside, but still clearly a cookie.
And yes, I have made these when I was tired, distracted, and missing an ingredient I swore I had. They are forgiving if you follow a couple basic rules, which I will get into later.
“I made these for a work potluck and they were gone in ten minutes. People kept asking if they were from a bakery. They stayed soft even the next day.”
Essential Ingredients for the Recipe
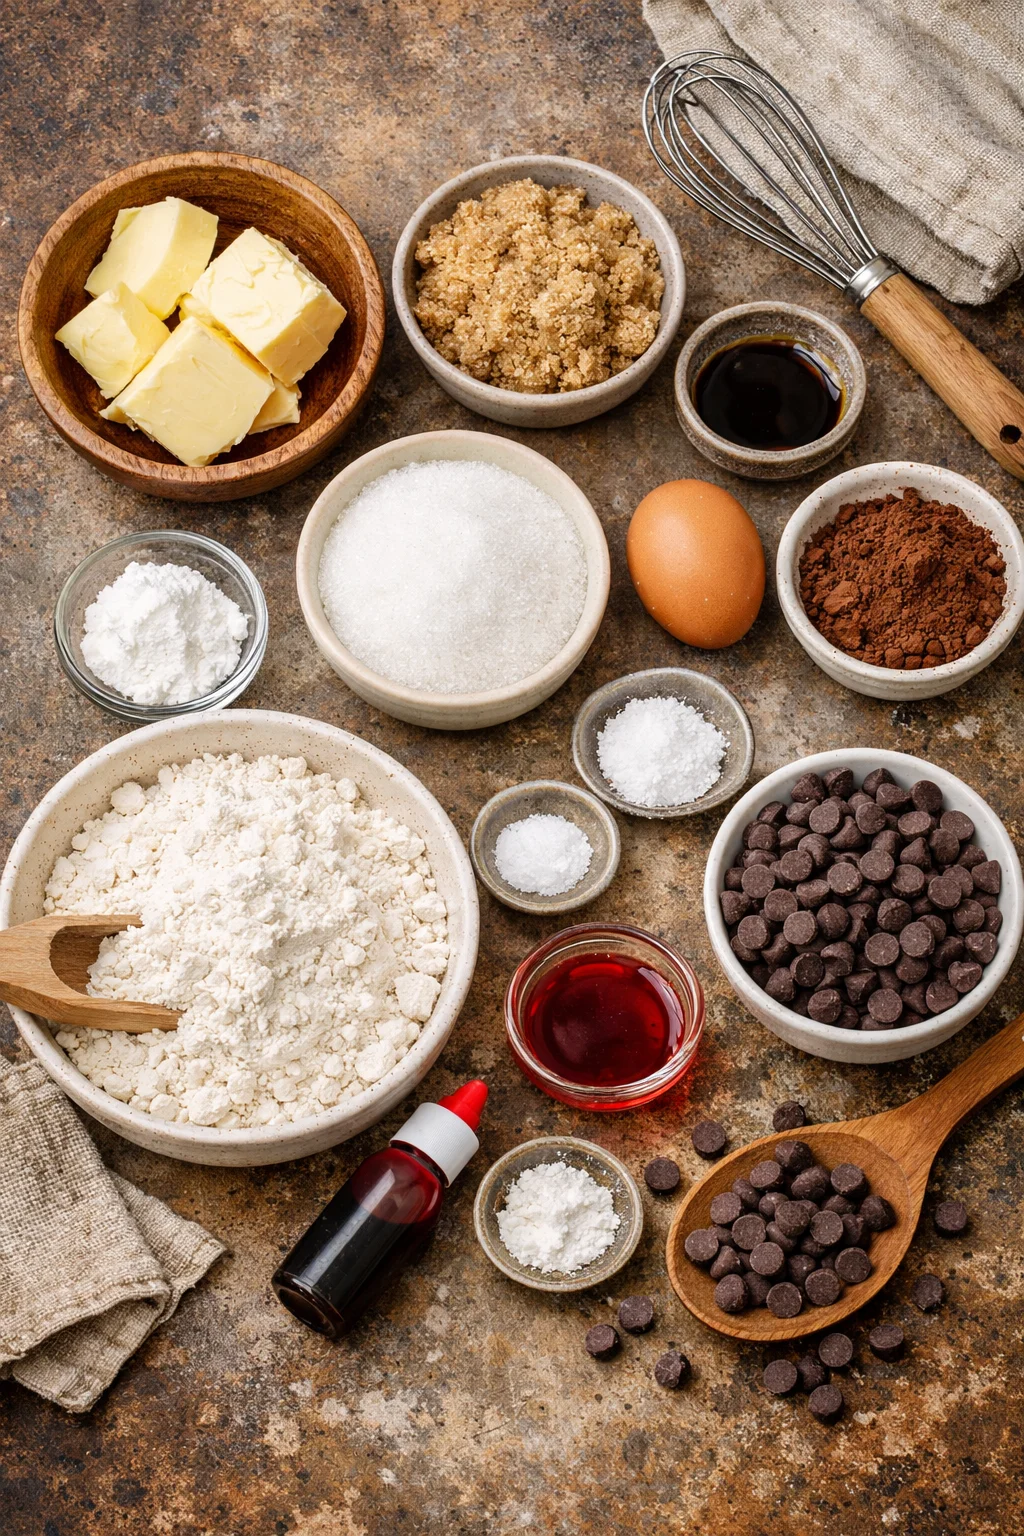
This is where Red Velvet Cookies can go from “pretty good” to “oh wow.” The ingredients are simple, but each one matters, especially since the cookie has a very specific flavor and look.
Here is what you will need:
- Butter: softened, not melted. This helps the cookie hold its shape.
- Brown sugar and white sugar: brown sugar gives chew and moisture, white sugar helps crisp edges a bit.
- Egg: binds everything and adds richness.
- Vanilla extract: do not skip it. It rounds out the cocoa.
- Cocoa powder: just enough for that red velvet chocolate base.
- All-purpose flour: spoon and level it if you can, so you do not pack in too much.
- Baking soda: gives lift and keeps the centers soft.
- Salt: makes the chocolate and vanilla pop.
- Red food coloring: gel works great, but liquid is fine too.
- Chocolate chips: semi-sweet is my go-to, but dark works if you like a deeper bite.
About the color: You can control how bold you want it. I like a deep red, but you can do a softer red if you are not into super bright desserts. Just remember, cocoa powder will darken the shade a little.
If you are building out a cookie tray, I love pairing these with something spicy or seasonal. This one is so good for fall baking: pumpkin spice oatmeal cookies. Different vibe, but they sit nicely together.
Step-by-Step Dough Preparation
Okay, here is the part where I always tell myself I will clean as I go, and then I do not. But the good news is the process is simple and you do not need fancy tools.
My easy mixing order that actually works
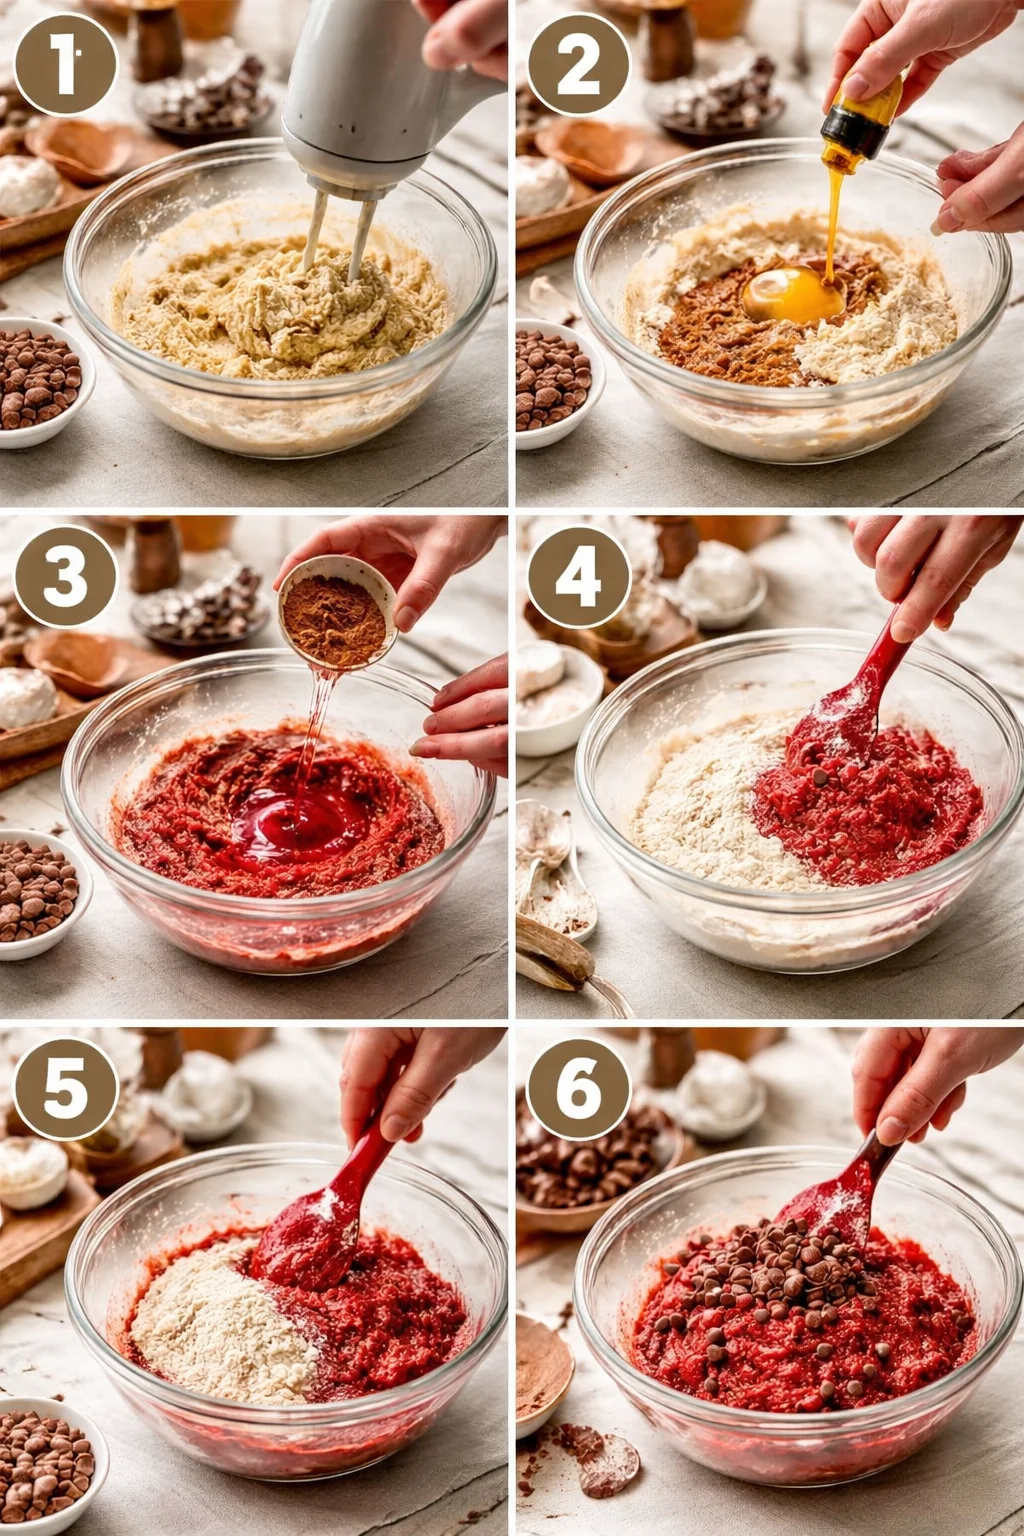
1) Cream butter and sugars. Beat the softened butter with brown sugar and white sugar until it looks fluffy. This helps with that soft center you want in Red Velvet Cookies.
2) Add egg and vanilla. Mix until smooth. If it looks a little separated at first, keep going and it will come together.
3) Add the color and cocoa. I like to add cocoa powder with the wet mix so it blends evenly and does not puff cocoa dust all over the kitchen. Then add the red food coloring and mix until the dough looks evenly tinted.
4) Stir in dry ingredients. In a separate bowl, whisk flour, baking soda, and salt. Add it to the wet bowl and mix just until you do not see streaks of flour.
5) Fold in chocolate chips. Save a small handful to press into the tops before baking. It makes them look bakery-style with those chocolate chips peeking out.
Little side note: if you are into fun, slightly spooky red velvet treats, you should peek at this bloody red velvet popcorn. It is goofy in the best way, and it makes a great movie-night snack next to cookies.
At this point the dough will feel soft. That is normal. Which brings us to the step people always want to skip, but should not.
Chilling Dough for Optimal Texture
I used to think chilling cookie dough was optional. Then I baked a tray of cookies that spread into one giant red cookie situation. Still tasty, but not exactly what I was going for. Chilling fixes that.
Why chill? It gives the flour time to hydrate, lets the butter firm up, and helps your cookies bake thicker with better chew. It also helps the color look more even once baked.
How long should you chill it?
I recommend at least 1 hour. If you can do 2 hours, even better. If you are planning ahead, you can chill it overnight. Just cover the bowl well so it does not dry out.
Quick tip: scoop the dough into balls before chilling. It is much easier than trying to scoop rock-hard dough later. I place the dough balls on a plate or tray, cover, and chill.
If you are the type who loves super low-effort sweets when cravings hit, you might also keep this one bookmarked: 2 ingredient peanut butter fudge. It is almost too easy, in a dangerous way.
Tips for Perfectly Baked Cookies
This is where your Red Velvet Cookies go from okay to the kind people text you about later. I am not saying you need to be precise like a pastry chef, but a few small choices really matter.
Timing and bake cues I swear by
Oven temp: 350°F works for most ovens. If your oven runs hot, consider 340°F to protect the color and keep the cookies soft.
Pan setup: Use parchment paper if you can. It prevents over-browning on the bottoms and helps with even baking.
Spacing: Give them room. They spread a bit even with chilling.
Bake time: Usually 9 to 11 minutes depending on cookie size. You want the edges set, but the centers should still look slightly underdone. They finish baking on the hot pan after you pull them out.
Do not overbake: This is the big one. Overbaked red velvet cookies lose that soft middle and can turn dry fast. If you are unsure, pull them a little early.
Extra chocolate on top: Press a few chocolate chips into the tops right after they come out. It makes them look pretty and it signals “chocolate chip cookie” in the best way.
Cooling: Let them sit on the tray for 5 minutes, then move to a rack. If you move them too soon, they can fall apart.
Also, if you are building a cookie table for a party, I love mixing flavors and colors. Something like carrot cake cookies gives you that soft spiced option next to the chocolatey red velvet vibe.
Common Questions
1) Can I make Red Velvet Cookies without food coloring?
Yes. They will taste similar, just more cocoa-brown than red. If you want a natural tint, a small amount of beet powder can help, but it will not look exactly the same.
2) Should I use gel or liquid food coloring?
Gel gives stronger color with less liquid, so the dough texture stays more consistent. Liquid works too, you may just need a bit more to get a deep red.
3) Can I freeze the dough?
Absolutely. Scoop into balls, freeze on a tray, then store in a freezer bag. Bake from frozen and add 1 to 2 minutes to the bake time.
4) Why did my cookies spread too much?
Common reasons are butter was too warm, dough was not chilled long enough, or your baking sheet was hot from a previous batch. Chill the dough and use a cool pan each round.
5) How do I store them so they stay soft?
Keep them in an airtight container at room temp. I like to add a small piece of bread in the container for extra softness. It sounds odd, but it works.
A sweet little send-off
If you try these, I really think you will see why Red Velvet Cookies have a permanent spot in my baking rotation. They are easy, they look festive, and they hit that perfect spot between cookie and brownie. If you want to compare versions, I have used tips from Red Velvet Chocolate Chip Cookies – Sally’s Baking Addiction and also checked ingredient notes from Red Velvet Cookies – Simply Recipes when I was tweaking my own batch. Bake a tray, share a few, and keep a couple for yourself while they are still warm. You have earned it.

Red Velvet Cookies
Ingredients
Method
- Cream butter and sugars together until fluffy.
- Add egg and vanilla, mixing until smooth.
- Mix in red food coloring and cocoa powder until evenly tinted.
- In a separate bowl, whisk the flour, baking soda, and salt, then add to the wet mixture.
- Fold in chocolate chips, saving a small handful for topping.
- Scoop the dough into balls and chill for at least 1 hour, up to overnight.
- Preheat oven to 350°F (or 340°F for hot ovens).
- Place dough balls on a parchment-lined baking sheet with space between each.
- Bake for 9 to 11 minutes until edges are set but centers are slightly underdone.
- Let cool on the tray for 5 minutes before transferring to a rack.