

Chocolate Rice Krispie Balls have this sneaky way of making an appearance at every potluck, birthday, or honestly, right when you need something sweet that isn’t a full-on five-star project. Ever notice how regular cookies can flop—like if you forget to set a timer or the oven just decides to go rogue? Not with these. Seriously, Rice Krispie balls are nearly impossible to mess up and people always come back for seconds. If you want a treat that delivers maximum “I made this!” energy with minimum mess, you’re in the right place. I’ve picked up some tasty tricks, too, after making like a hundred batches. Let’s jump in.
How to make chocolate Rice Krispie balls
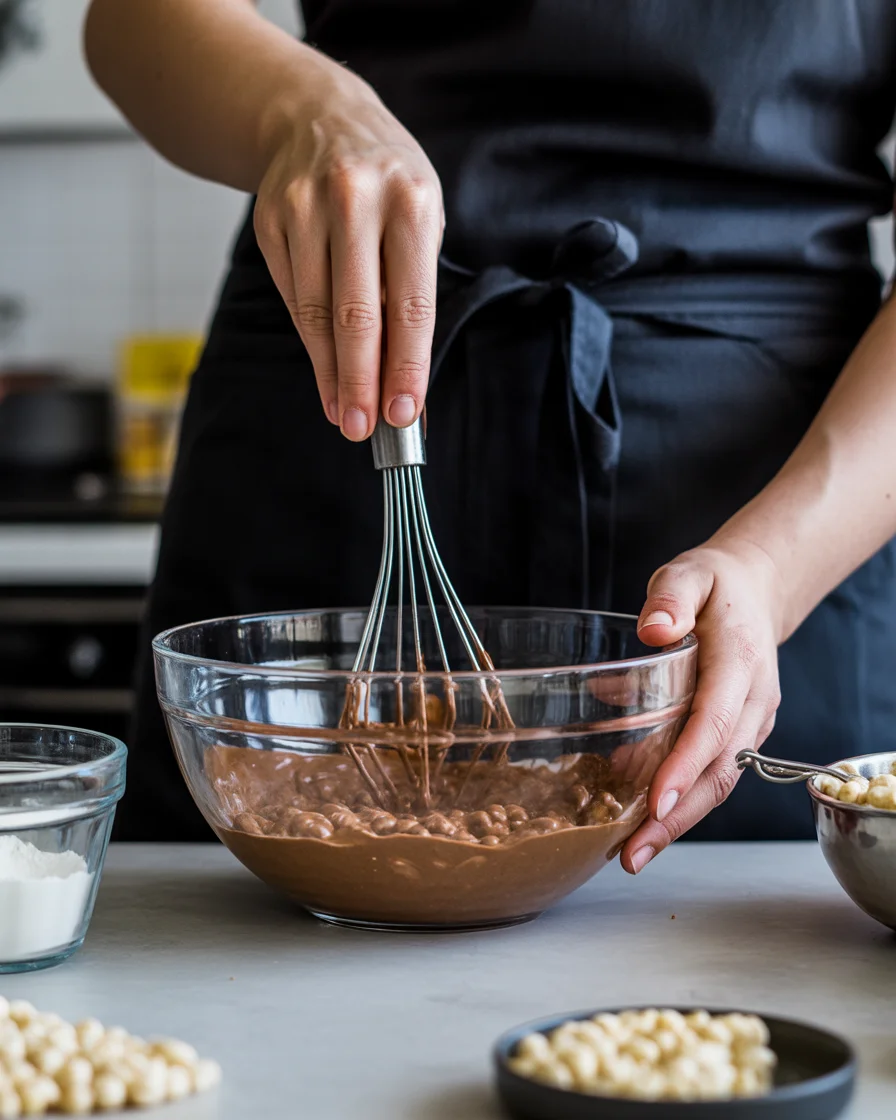
Alright, roll up your sleeves or just push up your hoodie, because this is as hands-on as it gets. Chocolate Rice Krispie balls honestly start with just a big bowl and a mixing spoon. I’ll be honest, you might get a little sticky. That’s half the fun, promise. Melt some chocolate (milk, dark, semi-sweet, go wild), then let it cool just a smidge—like, don’t pour it steaming on the cereal or you’re gonna have a goo mess.
Rice Krispies get dumped in next, then that sticky hero, peanut butter (smooth is easier, chunky is more drama). Add a little honey or corn syrup so everything actually sticks together. Stir it until your arm almost falls off or until there’s not a lonely crumb left. Then, using those clean hands, squish and roll scoops into balls. If you want a Pinterest-level look, toss them on a lined tray and pop them in the freezer for a few minutes so they’re not melting all over your kitchen.
“My kids come running the second they smell chocolate Rice Krispie balls. The recipe always works and I never go home with leftovers!” – Amber, Ohio
What you need to make chocolate peanut butter balls
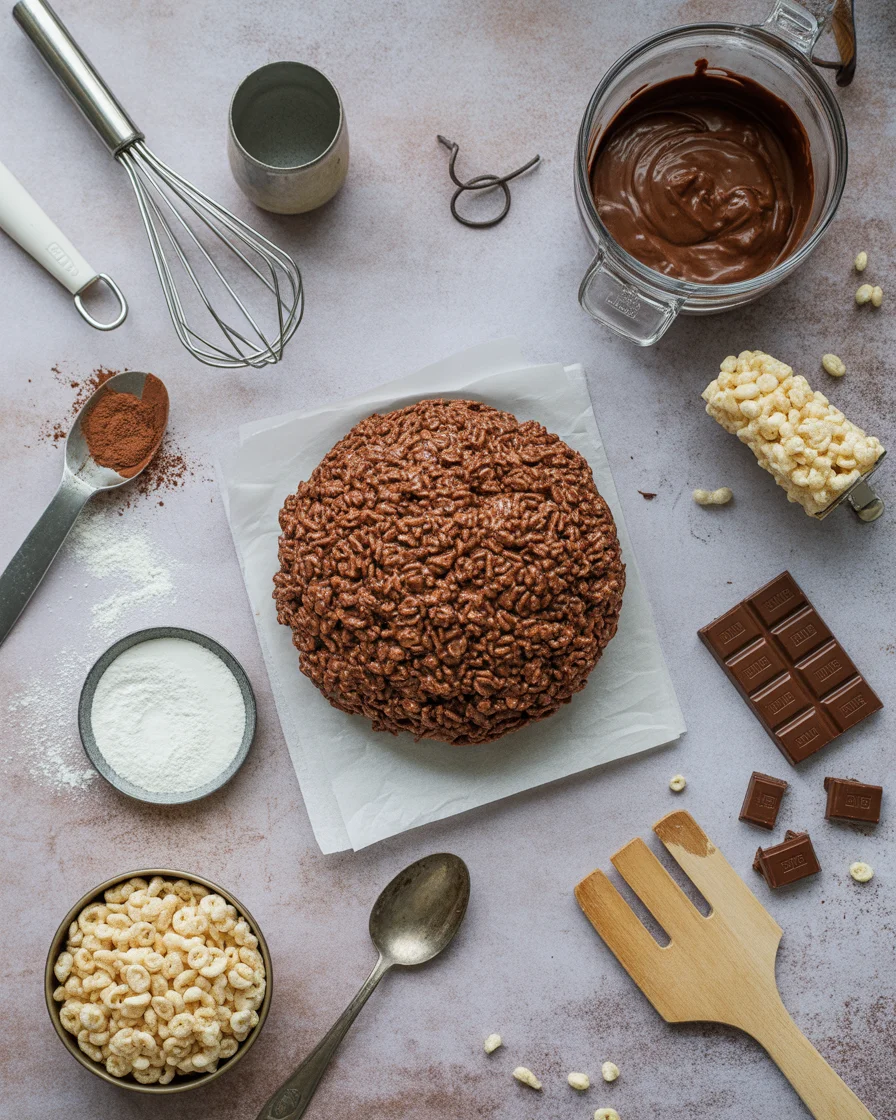
My pantry has seen some desperate days, but you only need a few basics for chocolate Rice Krispie balls. First: Rice Krispies cereal. Generic works, just needs to snap and crackle. Peanut butter is key for that fudgy vibe—seriously, don’t skip it. Chocolate chips or bars, your pick, just make sure it’s enough to hold things together and coat. Some folks sneak in a bit of softened butter or coconut oil to make the chocolate glossy. A dab of vanilla is optional, and a pinch of salt? Yeah, it wakes everything up. Grab parchment paper for easy setup (trust me, you don’t want these welded onto your pan). That’s pretty much it.
You could fancier it up with sprinkles or swap for almond butter or sunflower seed butter if you’re avoiding peanuts. But the big four remain: cereal, chocolate, peanut butter, and something sweet to bind it—honey or corn syrup.
Step-by-step guide to making Rice Krispie peanut butter balls
First, melt the chocolate and peanut butter together in a heatproof bowl. Microwave works fine, just go slow so it doesn’t scorch (twenty seconds at a time, lots of stirring). When it’s all smooth and dreamy, add your chosen sweetener and maybe the vanilla. Swirl it around, then add your Rice Krispies. This part’s satisfying—watching the cereal disappear into the goo.
Grab a spoon or cookie scoop if you wanna be precise. Drop the mix onto parchment and give it a roll with your palms (lightly oiled if things get silly sticky). Pop those spheres in the fridge or freezer for twenty-ish minutes. That’s it! If you want to coat them in extra chocolate, dip them once more and chill again. You could seriously teach a toddler to do this, it’s that easy.
Storage information for your treats
Let’s talk reality. Chocolate Rice Krispie balls never last long in my house, but say you need to hide them or accidentally made double. Best thing? Fridge—pop them in a sealed container, and they’ll stay happy up to a week. Got a picnic or hot weather? The freezer is your friend. Let them soften a little at room temp before serving or you’ll risk a dental emergency.
Storing at room temp works for like, a day, but I don’t trust my A/C that much. Always use wax or parchment paper between layers so nothing sticks (unless you like gnawing on a Rice Krispie brick). These treats are super portable; toss some in a baggie for lunchboxes or, let’s be real, for sneaky snacking during work breaks.
Tips for customizing and upgrading your Rice Krispie balls
Here’s where you channel your inner mad scientist. Want them exciting? Add colored sprinkles or even mini M&Ms right before rolling. Think about dropping in some mini chocolate chips, or swap chocolate for white chocolate if you wanna shake up the look. Almond extract instead of vanilla gives a bakery twist. Even a dusting of sea salt on top takes them up a notch—trust me, you’ll feel fancy for like, two seconds.
Trying for healthier? Sub in natural peanut butter and reduce the sweetener. Or use a higher-cacao chocolate. If you really want to impress, dip half the sphere in chocolate and drizzle with another color—it’s like Rice Krispies went to art school.
People say you can sneak in protein powder. Haven’t tried it, but hey, maybe you’ll end up with a gym-approved snack that doesn’t taste like cardboard.
Frequently Asked Questions about Chocolate Rice Krispie Balls
Q: Can you freeze chocolate Rice Krispie balls?
A: Totally! Use a freezer bag or airtight box. Thaw at room temp before serving so the texture’s just right.
Q: What if I don’t like peanut butter?
A: Swap for almond butter, sunflower seed butter, or even cookie butter if you’re feeling wild. All work great, just keep the texture soft for easy mixing.
Q: Can kids make these on their own?
A: With a little grown-up helping hand for the melting step, yes! Most of the process is safe and fun for kids.
Q: Can I double or halve the recipe?
A: Absolutely—just do some quick math. It’s pretty forgiving, so no worries if your ratios are a little off.
Q: Do these need to be refrigerated?
A: Fridge is best for keeping them fresh, especially if you dipped them in chocolate. Room temp’s okay for short-term.
Give these a whirl and let the compliments roll in
Okay, so you’ve now got the easiest game plan for making chocolate Rice Krispie balls that are basically guaranteed to win you points at every get-together. Don’t overthink it—mix, roll, chill, and snack. Plus, you can riff off the basic recipe all day long with different add-ins. If you want even more flavor inspiration, check out this genius take at Slow The Cook Down or a stellar peanut butter spin at Mom On Timeout. You don’t need pro baking skills, just a little kitchen spirit and a decent appetite. Happy snacking, and let me know how yours turn out—maybe save one or two for yourself before they vanish!

Chocolate Rice Krispie Balls
Ingredients
Method
- Melt the chocolate and peanut butter together in a heatproof bowl, using a microwave in 20-second intervals, stirring frequently until smooth.
- Add honey or corn syrup and vanilla extract to the melted mixture and mix well.
- Dump in the Rice Krispies and stir until fully coated.
- Using clean hands, scoop and roll the mixture into small balls.
- Place the formed balls onto parchment paper and chill in the fridge or freezer for about 20 minutes.
- Enjoy as is or dip the balls in extra melted chocolate and chill again before serving.