

Meringue Ghosts are that Halloween treat you always see online, but, honestly, they seem much easier in the pictures, right? I remember one October, I was wrestling with a mixer way past midnight, trying to get my meringues stiff but not crunchy like chalk. Weirdly, it ended up a sticky mess because humidity ruined everything. If you’ve tried and failed with these before or just want to nail it on the first go, I’ve picked up some tricks so you get those spooky little guys perfect for your Halloween spread, even if the weather’s being a total goblin. These aren’t just cute, they’re sweet, light, and will haunt the dessert table in a good way. Okay, let’s tackle Meringue Ghosts together and make them less of a ghost story gone wrong.
Tips for making the best Meringue Ghosts
Let’s just put it out there: patience is key. If you try to rush through whipping or you dump sugar in too fast, you’ll get weird deflated blobs instead of those cute ghost shapes. Use eggs at room temperature, every time. Cold eggs just refuse to fluff up the way we want for Meringue Ghosts.
Cleanliness counts for a lot. Any trace of oil or yolk in your bowl, and the meringue just won’t hold. I wipe mine down with lemon juice, which sounds wild but really helps. Also, don’t try to bake when it’s raining or super humid. Meringue pulls in moisture like it’s looking for trouble, so dry weather is a baker’s best friend here.
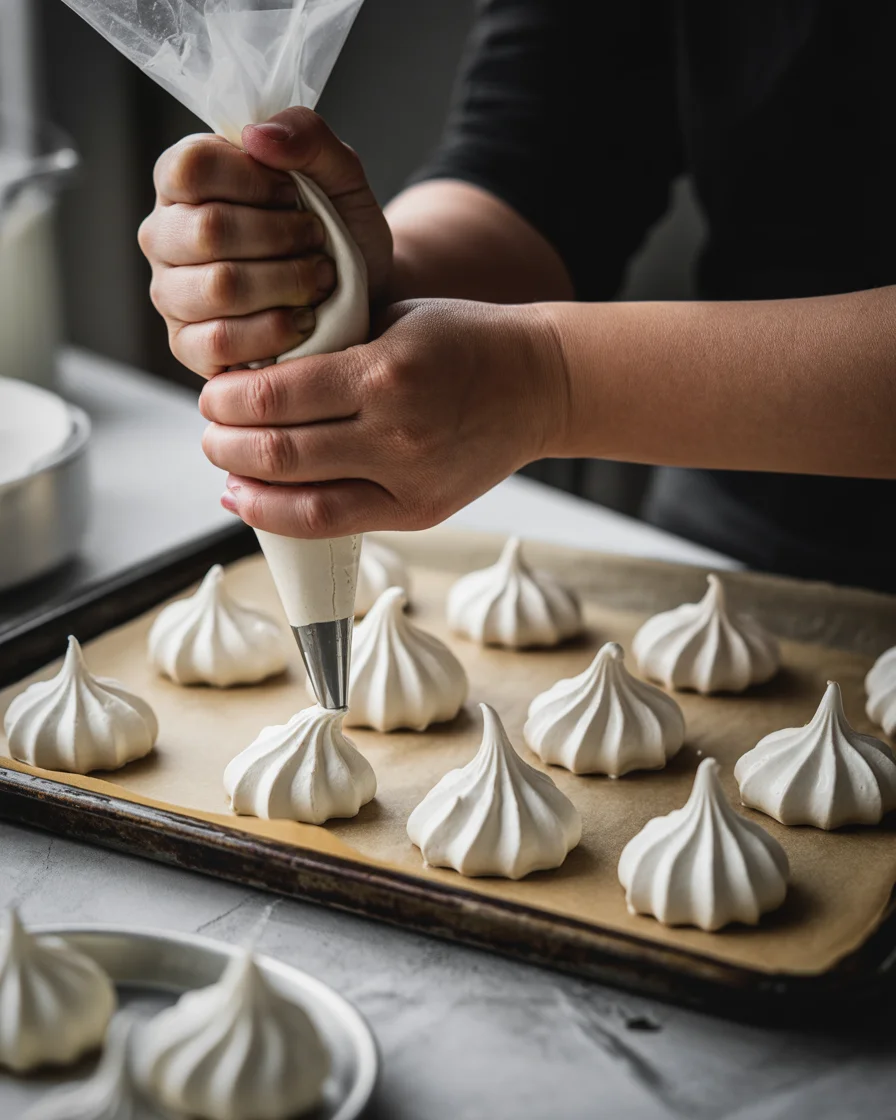
If you really want your ghosts to look more cartoon-cute than haunted disaster, use a piping bag with a big round tip to plop those little mounds. If you don’t have fancy tips, cut the end off a zip-top bag. Works just as well.
“I tried your meringue ghosts yesterday and they were gone in minutes at our block party! Best Halloween treat success I’ve had yet.” Emma C.
How to make Ghost Meringues
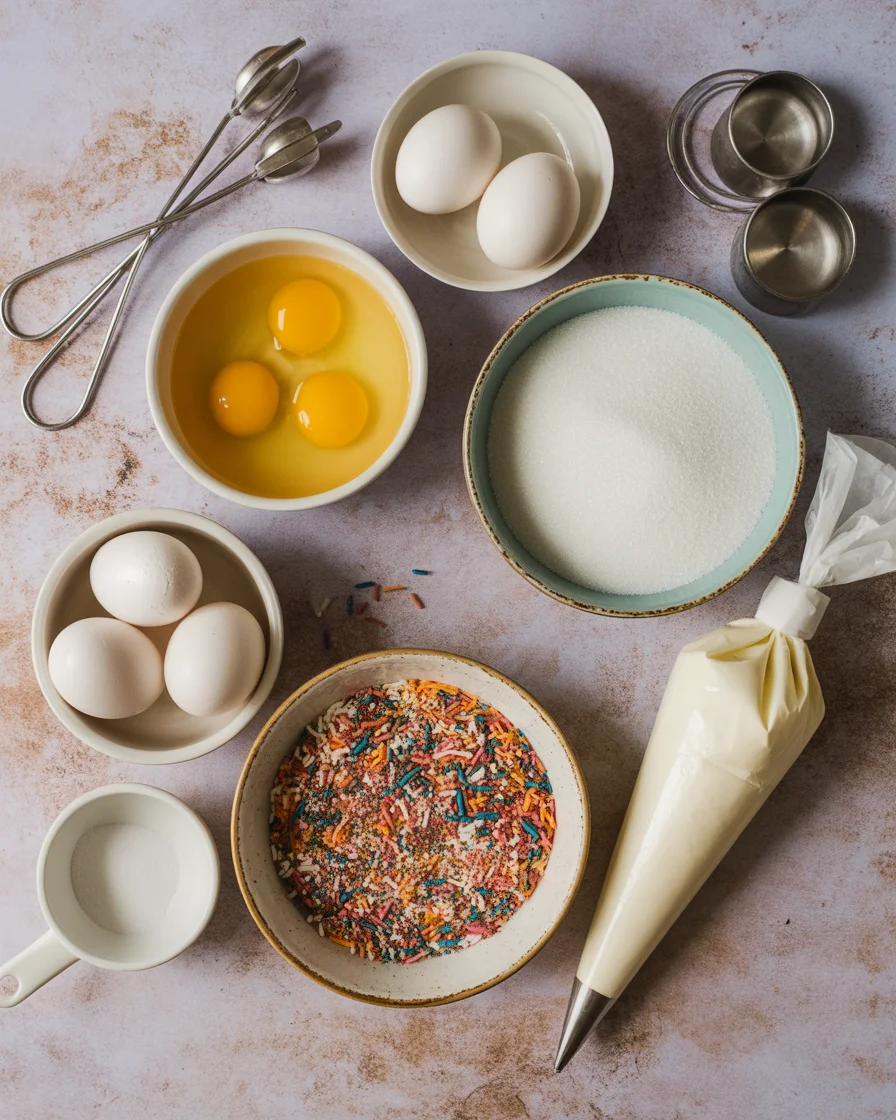
Start with eggs. Gently separate the whites; even a drop of yolk is a nightmare for this recipe. Pour them into a super clean bowl and start mixing on medium. Once they look foamy (like bubble bath, honestly), add cream of tartar. It’s optional, but I swear it makes the peaks stronger.
Crank your mixer up and add sugar, but SLOWLY. Like, one spoonful at a time. If you dump it all at once, forget about stiff peaks. It’ll look shiny, almost glossy when it’s ready. You want to be able to turn the bowl upside down and have it stay put — a funny test that’s also kind of terrifying, but it works.
Now pipe little ghosts onto parchment-lined baking trays. Pull up slightly as you finish each one for the “head” and a spookier shape. Bake low and slow. Patience again! If you try to speed-bake, the meringue ghosts will brown and lose their ghostly look.
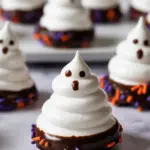
Decorate their faces with melted chocolate or edible markers. You don’t need a steady hand — their lopsided smiles just add to the weird Halloween charm.
Meringue Tips and Tricks
This section is all about the weird stuff that’s ruined my meringue ghosts over the years. First, don’t bake when it’s humid. Sounds dramatic, but it matters. The air will make your ghosts get all sticky and chewy, not crisp and light.
Add sugar one spoon at a time, not too fast, or you get grainy meringue. The bowl and the whisk need to be bone-dry and grease-free — I once used a bowl that looked clean, and it totally ruined the batch.
Also, don’t over-bake. Meringues should be dry, not totally brown. Sometimes, when you take them out, they feel soft. That’s fine. They’ll harden a bit as they sit. Oh — and try not to freak out when cracks appear! A little cracking is totally normal.
Why leave the meringues in the oven?
After you finish baking, don’t yank them out right away. I know, that’s what everyone wants to do. But letting them cool in the oven is magic — I mean, it’s what keeps the meringue ghosts from shrinking or cracking too much.
You basically turn off the oven, crack the door a bit, and let them cool down with the oven. This gentle cool-down makes the texture better and stops that dreaded collapse in the middle.
It also means the outsides stay crisp while the insides set up properly. Skip this step and you risk chewy ghosts, which isn’t the vibe we’re after unless you’re into supernatural rubber.
Storing meringue ghost cookies
Storing these ghosts is easy, but there’s a catch: they hate moisture. So, once they’re cool, pop them in an airtight container. Leave them on the counter, not the fridge. If you toss them in the fridge, they’ll go soggy and sad before you can say “boo.” Been there, major regret.
If you need to make them ahead for a party, you’re safe — just make sure no little hands sneak into the container. They’re best eaten in a couple of days, although I don’t usually have leftovers to test that theory (kids demolish them).
Serving suggestions
- Lay them on a plate surrounded by fake spider webs for a haunted dessert table
- Use them to top cupcakes, brownies, or even creepy Halloween trifles
- Add edible eyes or silver dragees for a fancier look
- Serve with hot cocoa for a sweet Halloween night treat
Common Questions
Q: Can I use boxed egg whites, or do they have to be fresh?
A: Fresh is always better, but if you use boxed, make sure there’s nothing added like salt or preservatives — it affects how the meringues hold up.
Q: Why did my meringue ghosts turn brown?
A: Most likely, the oven was a bit too hot. Bake at a low temp and don’t rush it. Sometimes, ovens are sneaky and run hotter than you think.
Q: Can I freeze meringue ghosts?
A: Nope, don’t do it. They absorb moisture and go mushy. You’re better off just making a fresh batch.
Q: How do you keep the ghosts’ eyes from smearing?
A: Wait until they cool completely before adding faces. If you draw on warm meringues, the chocolate melts all over the place.
Q: What can I do with leftover egg yolks?
A: Pudding, custard, or scrambled eggs are always my route. Never toss them out!
No Tricks, Just Sweet Treats: Happy Halloween!
There you have it. Meringue Ghosts aren’t complicated once you know what to watch out for — a dry day, squeaky clean bowl, and just a sprinkle of patience. Honestly, there’s something satisfying when you make a Halloween treat this adorable with just three ingredients. If you ever need more ideas or some extra confidence, I always find great inspiration from Meringue Ghosts – Herbs & Flour and the fun styles over at Ghost Meringues for Halloween ~ Barley & Sage. You’ve totally got this — have fun and don’t be afraid to make a few wonky ghosts. Honestly, that’s what makes a Halloween dessert table unforgettable!
Meringue Ghosts
Ingredients
Method
- Preheat the oven to 200°F (93°C).
- Gently separate the egg whites into a clean bowl, ensuring no yolk gets mixed in.
- Start mixing the egg whites on medium speed until they look foamy.
- Add cream of tartar and continue to mix.
- Increase the mixer speed and slowly add sugar one spoonful at a time until the mixture is glossy and can hold stiff peaks.
- Pipe small ghost shapes onto parchment-lined baking trays.
- Bake in the preheated oven for 90 minutes, avoiding the temptation to open the oven door.
- After baking, turn off the oven, crack the door, and let the meringues cool completely in the oven.
- Once cooled, decorate the faces of the meringue ghosts using melted chocolate or edible markers.