
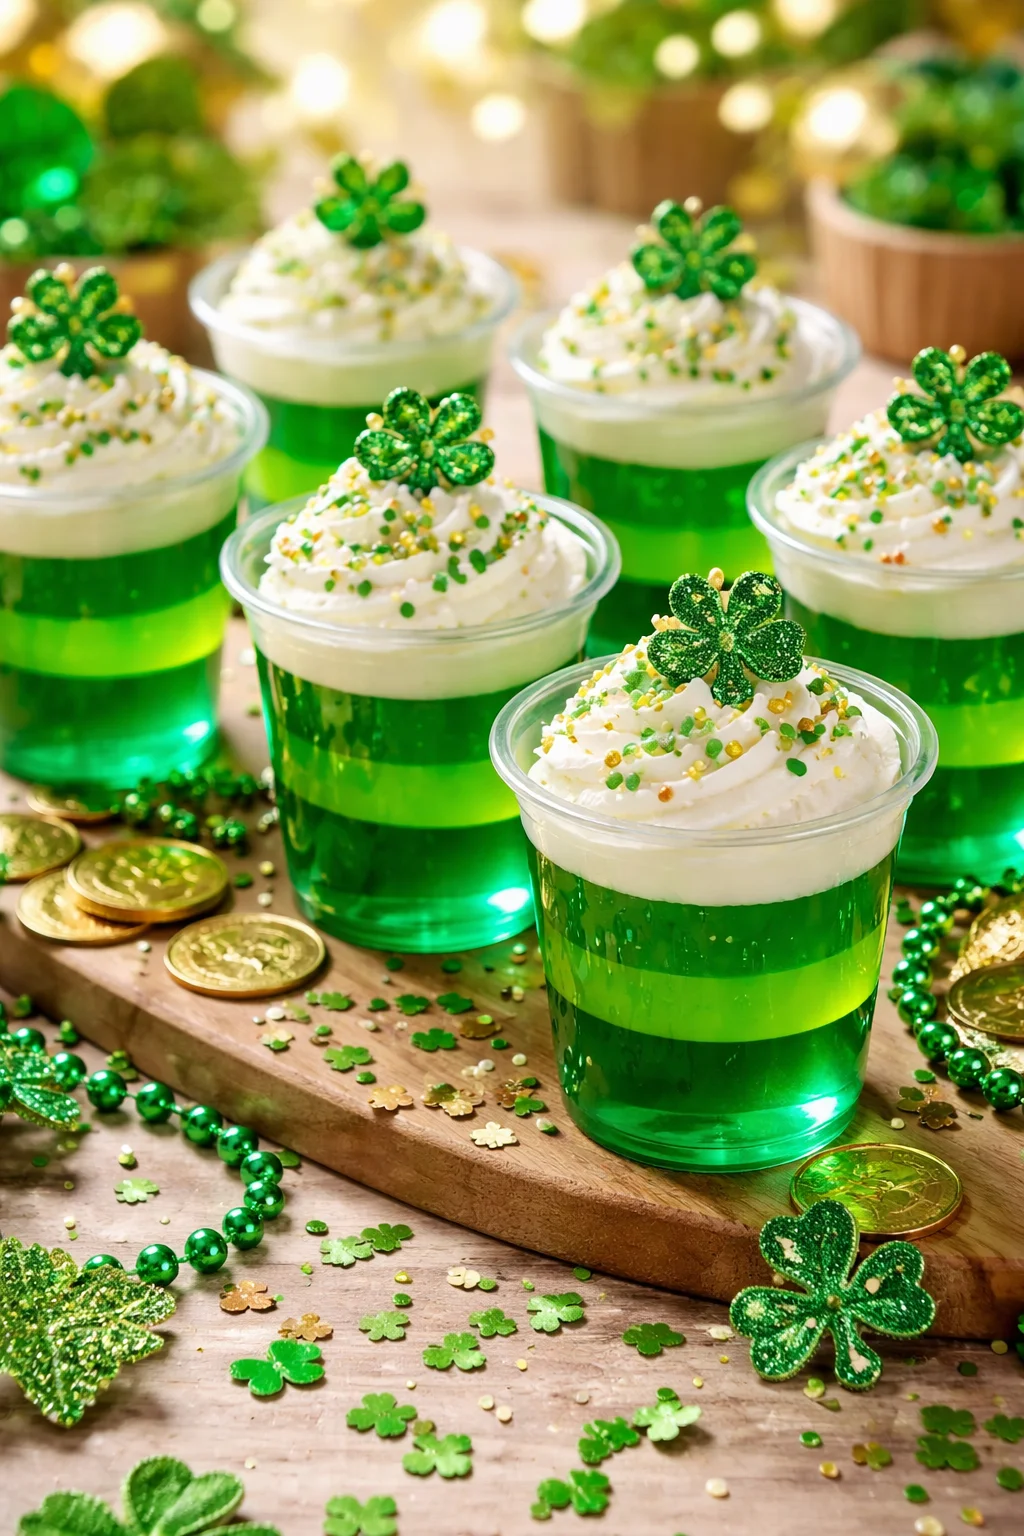
St. Patrick’s Day Jello Cups are my go to treat when I want something festive that looks like I tried really hard, even when I did not. You know those days when you need a quick party dessert for a school event, a work potluck, or just a movie night at home? This is that recipe. They are bright, jiggly, and honestly kind of impossible not to smile at when you open the fridge. I started making them because cupcakes felt like too much work, and now my friends ask for them every March. Let me walk you through exactly how I do it, with the little lessons I learned the messy way.
How to make Irish Flag Jello shots
I love the Irish flag look because it is simple and instantly recognizable. Also, layering is way easier than it sounds, as long as you give each layer time to set. I am calling these “shots” in the classic sense, but you can absolutely make them kid friendly by skipping the alcohol and using cold water instead.
Ingredients and simple step by step
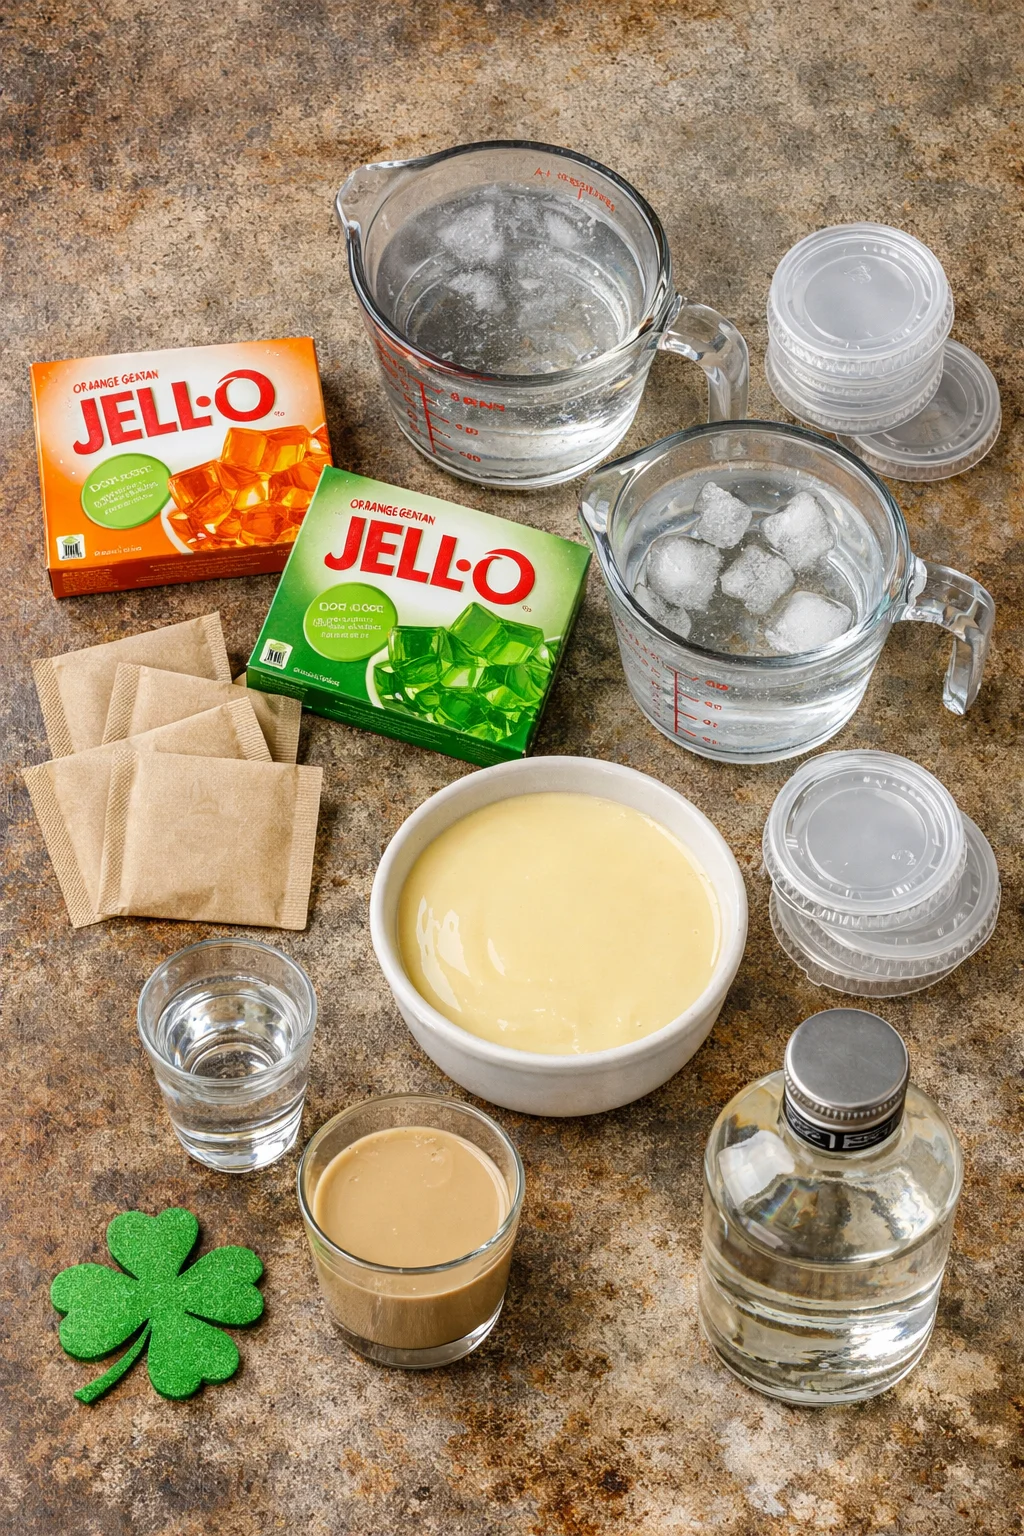
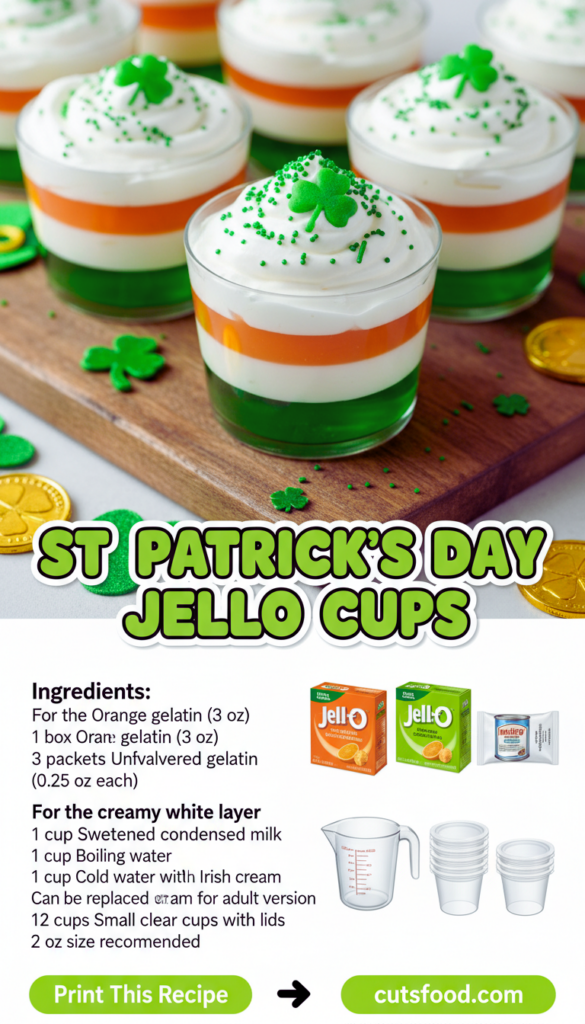
- Orange gelatin (1 box, 3 oz)
- Lime gelatin (1 box, 3 oz)
- Unflavored gelatin (3 packets, 0.25 oz each) for the creamy white layer
- Sweetened condensed milk (about 1 cup) for that classic creamy center
- Boiling water and cold water
- Optional: vodka or Irish cream for the adult version
- Small clear cups with lids (2 oz works great)
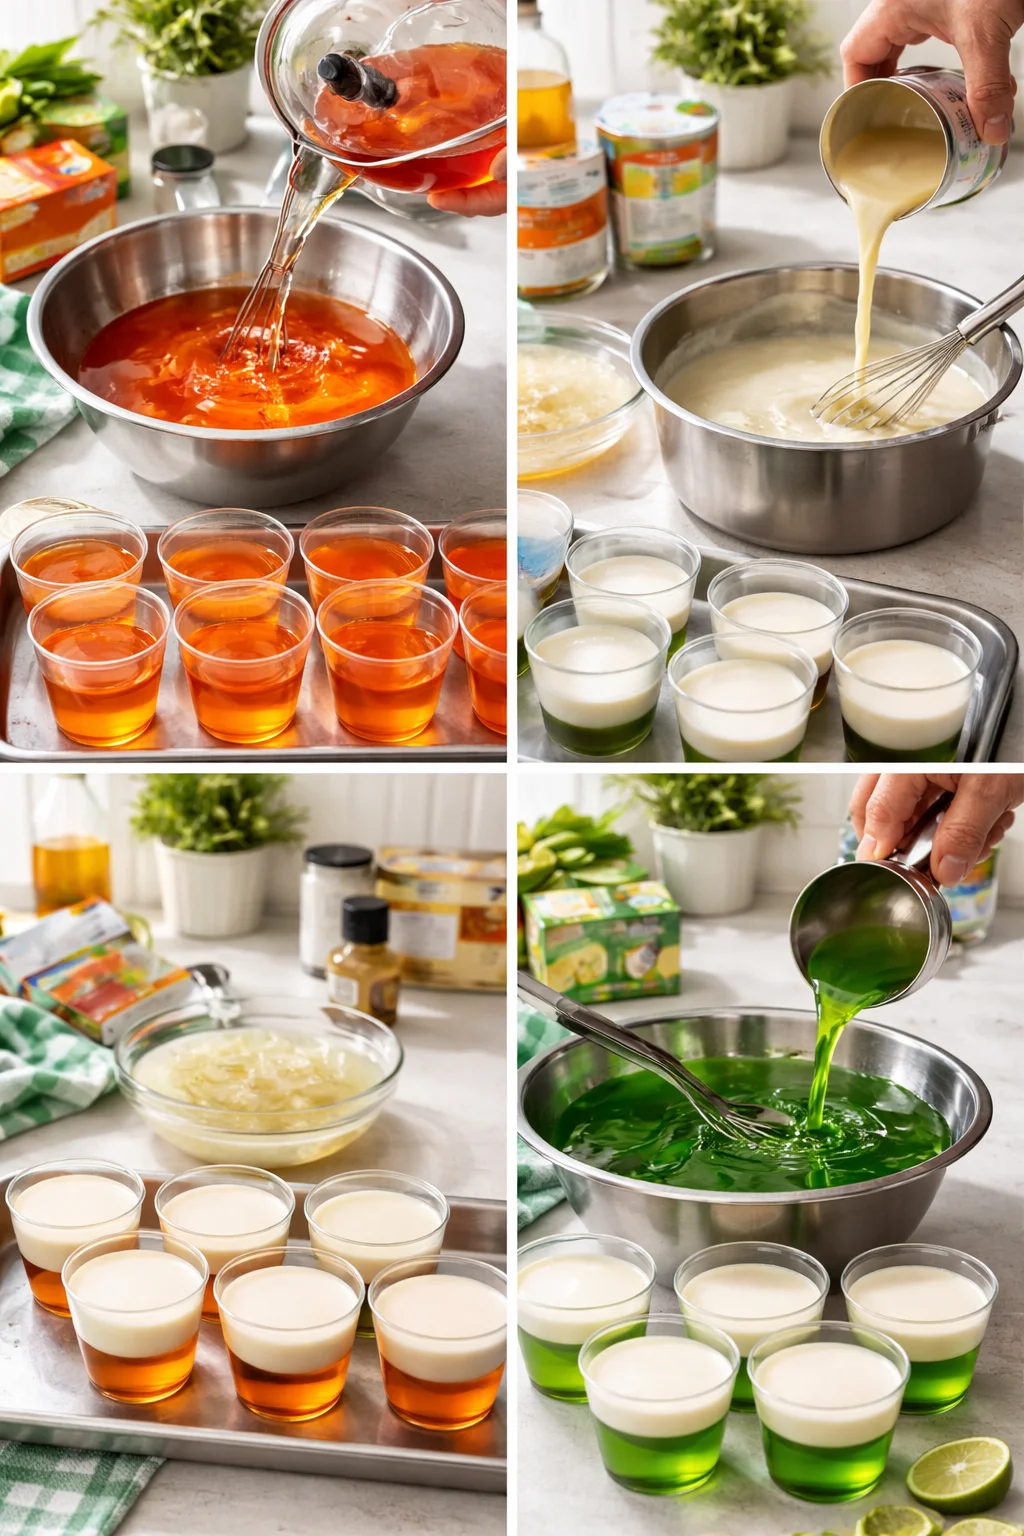
Here is my basic game plan. First, set your cups on a tray that fits in your fridge. This saves your sanity later when you are carrying wobbly liquid. Mix your orange gelatin with boiling water until totally dissolved, then add cold water (or your alcohol portion). Pour a small amount into each cup, about one third full. Chill until firm, usually 25 to 40 minutes depending on your fridge.
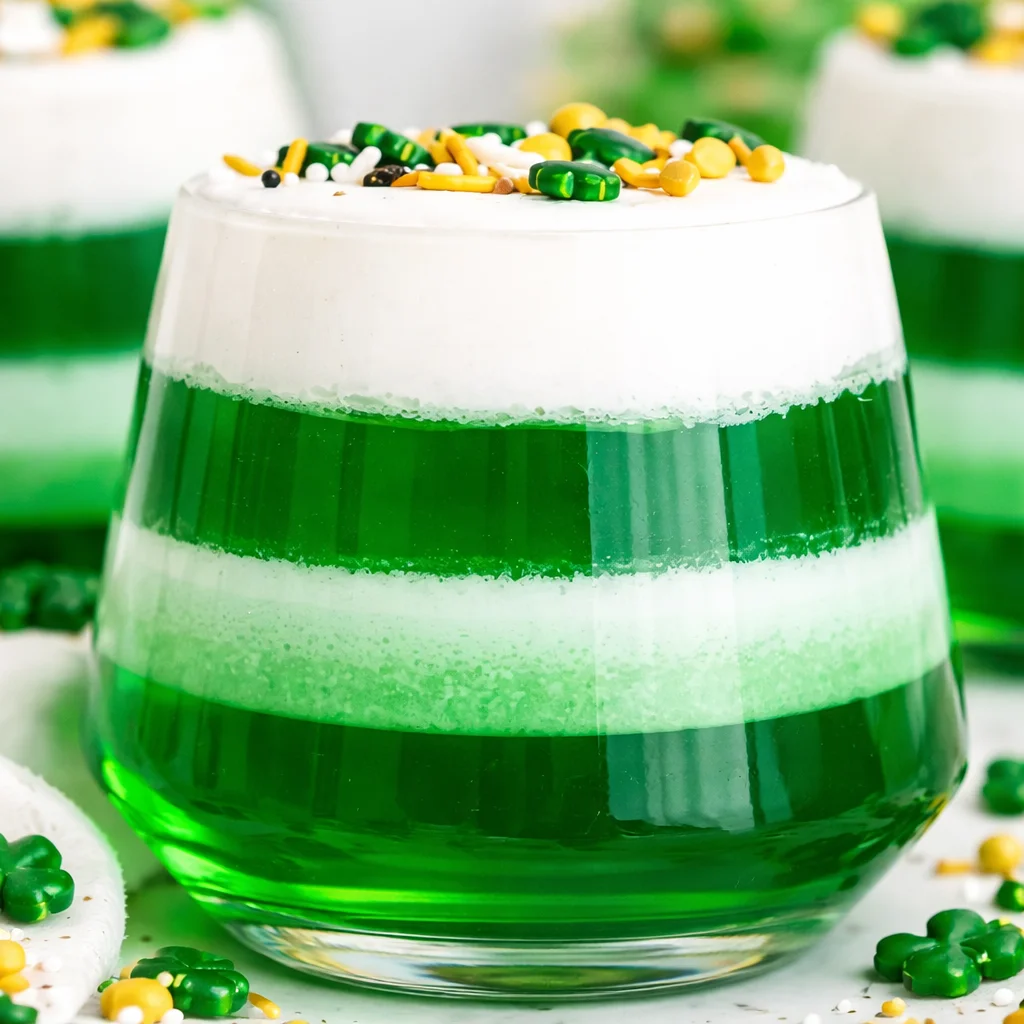
For the creamy white middle, I use unflavored gelatin plus condensed milk. Bloom the unflavored gelatin in cold water for a few minutes, then add boiling water and stir until smooth. Let it cool for a few minutes so it is not hot, then stir in condensed milk. You want it pourable, not steaming. Pour gently over the orange layer. My little trick is to pour over the back of a spoon so the layers stay clean. Chill again until set.
Last comes the lime gelatin. Mix it the same way as the orange, then let it cool briefly. Pour it on top of the white layer and chill until everything is fully set. When you pop the lids on and line them up, the flag colors look so cute and tidy.
If you like seasonal desserts like this, I also keep a few other “cute cup” ideas saved for later, like these fall themed treats at Pumpkin Patch Dirt Cups. Same easy vibe, different season.
Supplies needed for Jello shots
Once you make these once, you will realize the supplies matter more than fancy skills. You do not need anything professional, but a few things make it smoother and keep your layers crisp.
Here is what I grab every time:
Clear plastic cups: The whole point is showing off the layers, so clear is best. I like 2 oz cups for parties, but 4 oz cups are great for kid friendly versions.
A rimmed tray or baking sheet: This is non negotiable for me. I fill the cups while they are already on the tray, then slide the tray into the fridge.
A measuring cup with a spout: Pouring from a bowl is asking for sticky chaos.
A spoon: For that “pour over the back of the spoon” trick to protect your layers.
Timer: Layering works best when you do not guess. If you under chill, layers blend. If you over chill, the new layer might not stick as nicely. Timer keeps you honest.
I also recommend paper towels and a damp cloth nearby because there is always one drip that tries to ruin your cute presentation.
If you are planning a full breakfast spread before your St. Patrick’s Day party, I am obsessed with these savory Creamy Bacon Cheddar Bagels. Not exactly green, but they disappear fast.
Additions and variations for Jello shots
This is where you can make the recipe feel like yours. The base version is already fun, but little tweaks can match your crowd and make things more interesting.
Make them kid friendly: Just use cold water in place of alcohol. You can also pour them into slightly bigger cups and add a swirl of whipped cream on top right before serving.
Change the flavors: Orange and lime are classic for the flag, but you can play around. For example, use pineapple instead of lime for a softer greenish yellow vibe, or use a green apple gelatin for a brighter pop.
Add a topping: Sprinkle on green sanding sugar, shamrock sprinkles, or even a tiny piece of rainbow candy right before serving. I avoid toppings during chilling because they can bleed color or get weird.
Do a “dessert cup” version: Instead of shots, make St. Patrick’s Day Jello Cups with a cookie crumble layer at the bottom. Vanilla wafers or graham cracker crumbs are good. It turns it into a spoon dessert that feels a little more filling.
Swap the creamy middle: If you do not love condensed milk, you can do a cream cheese version. Just make sure whatever you use stays smooth and pourable, or it can set lumpy.
For a quick drink to go with these, I like a simple smoothie earlier in the day so I feel like I am making good choices before dessert shows up. This Blueberry Banana Oatmeal Smoothie is one I make on repeat.
Expert tips for perfect Jello shots
I have made every mistake possible with gelatin, so here are the tips that actually matter. These are the things that make your St. Patrick’s Day Jello Cups look neat instead of muddy.
Let each layer set fully, but not overnight: You want it firm to the touch. If you pour too soon, you get blended colors. If you wait too long, layers can separate when you bite in.
Cool the next layer before pouring: If your gelatin is still hot, it can melt the layer underneath. I usually let the mixed gelatin sit 8 to 10 minutes on the counter.
Use the spoon trick: Pouring over the back of a spoon is not fussy, it is the easiest way to keep layers clean.
Do not overdo the alcohol: Too much alcohol can stop gelatin from setting properly. A safe rule is replacing only part of the cold water with alcohol, not all of it.
Fridge placement matters: Put the tray on a flat shelf where it will not get bumped. If your fridge shelf tilts, your layers will tilt too. Cute for abstract art, not for flags.
“I brought these to our neighborhood party and people kept coming back to the fridge for just one more. The layers were so pretty and they tasted like a creamsicle meets lime candy.”
One more small tip, write the flavor on the lid if you are making multiple kinds. When everything looks green and orange in a cooler, it is easy to forget what is what.
More St. Patrick’s Day recipes
If you are building a whole little spread, I like mixing sweet and savory so it feels like a mini celebration instead of just one dessert on a table. These St. Patrick’s Day Jello Cups are always my centerpiece because they scream “holiday” without needing any baking, but it is nice to add a few other things too.
For something sweet and shareable, cookies are always a win. If you are already in a sprinkle mood, these are super fun: Sparkle Sweetheart Cookies. I know they are technically a Valentine’s Day thing, but honestly, sparkly cookies do not care what month it is.
If you want more holiday inspiration across the year, I also browse this section when I need themed ideas fast: Valentine’s Day recipes. It is a good reminder that cute food does not have to be complicated.
And if you are serving these cups at a party, set them out with a little label and a stack of napkins. Gelatin desserts are neat until the first person bumps the table, then it becomes a napkin situation.
Common Questions
Can I make St. Patrick’s Day Jello Cups the night before?
Yes, and I usually do. They are best within 24 hours for the cleanest layers and texture. Keep them covered with lids or plastic wrap so they do not pick up fridge smells.
How long does each layer take to set?
In my fridge, about 25 to 40 minutes per layer. If your fridge runs warm or you poured thicker layers, it might take closer to 45 minutes.
Why did my layers mix together?
Most likely the bottom layer was not fully set or the new layer was too warm. Next time, chill a bit longer and let the freshly mixed gelatin cool on the counter before pouring.
Can I make these without condensed milk?
You can. Try a cream cheese based middle or even just use a clear or lightly colored gelatin for the white stripe look, but it will not taste as creamy.
How do I transport them without a mess?
Use cups with lids and carry them on a flat tray. If you are driving, put the tray in a cooler with an ice pack underneath, and keep it level.
A sweet little send off
If you want one fun thing to make this March, St. Patrick’s Day Jello Cups are it. They are easy, they travel well, and they always get that “wait, you made these?” reaction. If you feel like comparing ideas, check out the St. Patrick’s Day Rainbow Gelatin Cups Recipe – Pillsbury Baking for more colorful inspiration, or the classic party style from St. Patrick’s Day Jello Shots – Crayons & Cravings. Make a batch, pop them in the fridge, and let future you feel very smug when dessert is already done.
St. Patrick’s Day Jello Cups
Ingredients
Method
- Set your small cups on a tray that fits in your fridge.
- Mix orange gelatin with boiling water until completely dissolved, then stir in cold water (or replace with vodka for adult version).
- Pour approximately one third of the orange mixture into each clear cup and chill until firm, about 25 to 40 minutes.
- For the creamy white layer, bloom unflavored gelatin in cold water for a few minutes, then dissolve in boiling water. Let it cool slightly before stirring in the sweetened condensed milk.
- Gently pour the creamy mixture over the set orange layer using the back of a spoon to maintain clean layers, then chill until set.
- Prepare the lime gelatin in the same way as the orange layer, let it cool, and pour it atop the white layer. Chill until all layers are fully set.