

Christmas Red Velvet Cheesecake Recipe is the dessert I bring out when I want jaws to drop and plates to come back clean. If you love the cozy flavor of red velvet and the creamy goodness of cheesecake, this is your sweet spot. I know the holidays get busy and oven space fights are real, but this one’s worth making room for. The color is festive, the texture is silky, and the taste is pure magic. I’ll walk you through the whole thing with easy steps and honest tips so you feel confident from crust to final slice.
What is Red Velvet Cheesecake?
Red velvet is that fun mix of gentle cocoa, a tiny tang, and a plush cake vibe. When you turn it into a cheesecake, you get a creamy, rich center with the signature red hue that looks incredible on a holiday table. My version keeps the flavor balanced, not too sweet, with a chocolate cookie crust that holds it all together. It’s elegant, but it eats like comfort food.
The Flavor Profile
Think soft cocoa notes, a subtle vanilla backbone, and a little tang from buttermilk and cream cheese. The color is bold, but the taste is smooth and not heavy. I’ve tested this recipe enough to know that a little cocoa goes a long way and that fresh cream cheese makes a big difference in texture. The result is a velvety bite that melts away and makes people quietly reach for seconds.
Why It Works for the Holidays
Two words: show stopper. The red color contrasts beautifully with a snowy swirl of cream or white chocolate curls on top. Plus, it slices clean and serves a crowd. If you like themed desserts for your table, this pairs well with cookies or a classic trifle, and it’s easier than many layered cakes. If you want another festive cheesecake idea, this sugar cookie cheesecake is a fun twist too.
Ingredients You Will Need
Here’s your simple, reliable shopping list. Room temperature ingredients blend smoothly and prevent lumps, so pull everything out 30 to 45 minutes before you start.
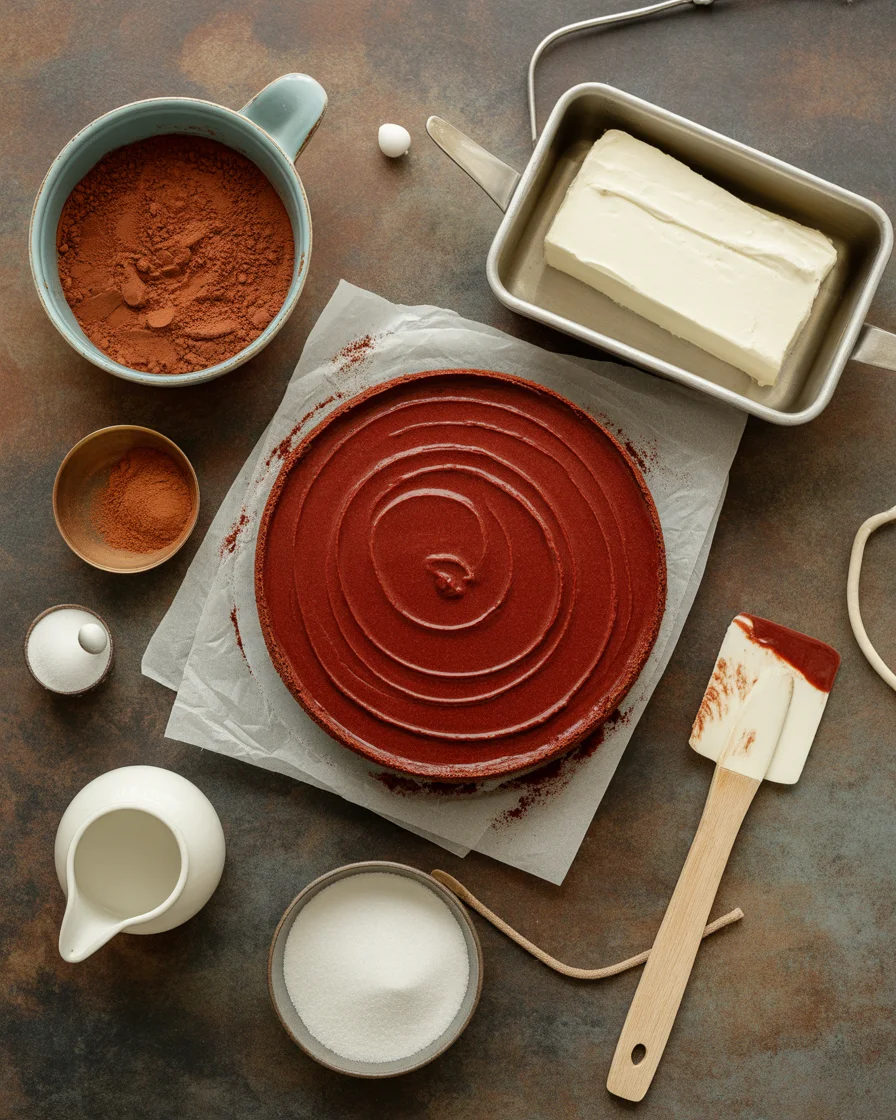
- Crust: 2 cups chocolate cookie crumbs, 5 tbsp melted unsalted butter, pinch of salt
- Cream Cheese Base: 24 oz cream cheese (brick style), room temp
- 1 cup granulated sugar
- 3 large eggs, room temp
- 3/4 cup sour cream, room temp
- 1/3 cup buttermilk, room temp
- 2 tsp pure vanilla extract
- 1.5 tbsp natural cocoa powder (not Dutch processed)
- 1.5 to 2 tbsp red gel food color
- 1 tsp white vinegar or lemon juice (helps with color and tenderness)
- Optional Toppings: lightly sweetened whipped cream, white chocolate curls, crushed candy cane
Equipment Check
You’ll need a 9-inch springform pan, heavy-duty foil, a roasting pan for the water bath, and a stand mixer or hand mixer. I also keep a thin knife for releasing the cheesecake after chilling. If you’re a cheesecake fan in general, save this Instant Pot salted caramel cheesecake for a different day when you want a hands-off approach.
How To Make Red Velvet Cheesecake
Let’s keep this easy and calm. I promise a water bath is doable. It’s the little secret to crack-free results and ultra creamy texture.
- Prep: Heat your oven to 325°F. Boil a full kettle of water for the bath. Wrap the outside of your springform pan with two snug layers of heavy foil.
- Make the crust: Stir cookie crumbs, melted butter, and salt until it feels like damp sand. Press firmly into the bottom of the pan. Bake for 8 minutes, then cool while you make the filling.
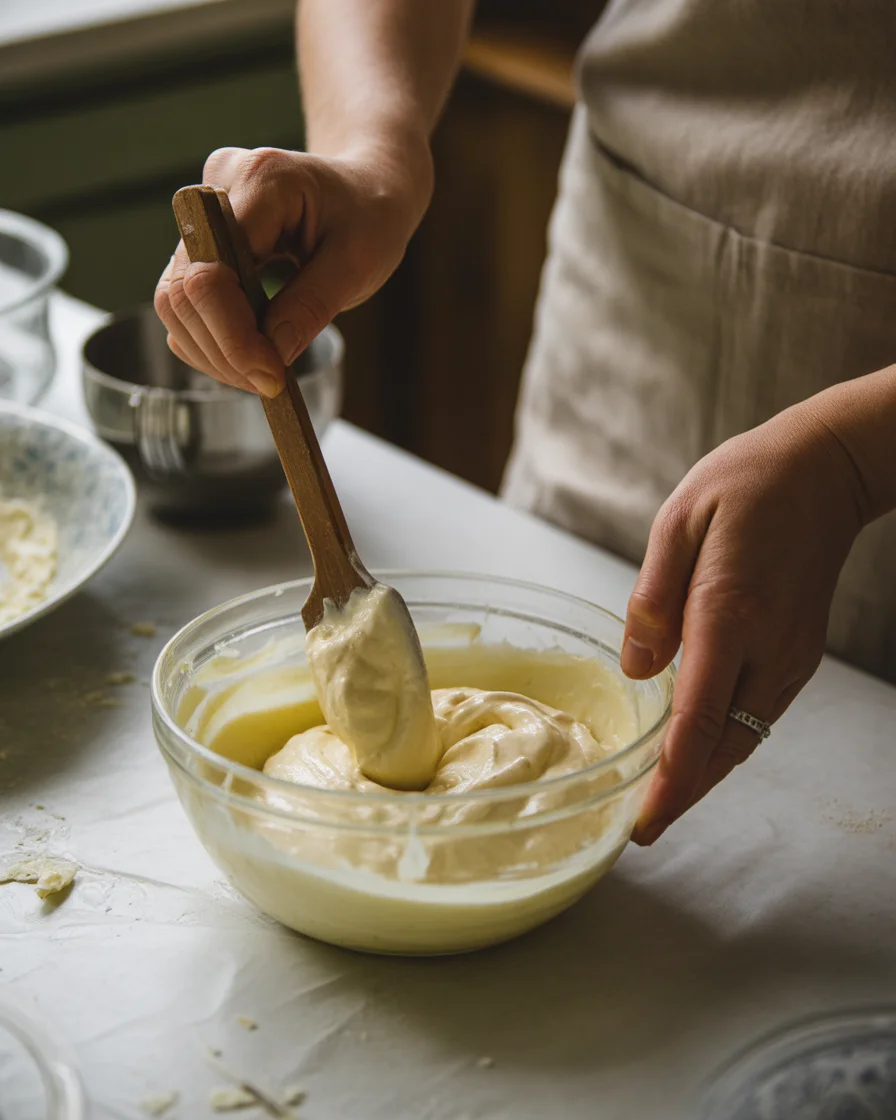
- Beat cream cheese and sugar: Mix on medium until completely smooth, scraping the bowl a few times. No lumps is the goal.
- Add sour cream and buttermilk: Beat on low until combined. Add vanilla, cocoa, and vinegar. Mix just until smooth.
- Color it: Add red gel food color a little at a time. Aim for a deep red that still looks appetizing. Gels are stronger and won’t water down the batter.
- Eggs last: Mix in eggs one at a time on low, just until combined. Overmixing adds air, which can cause cracks.
- Pour and set up the bath: Pour filling into the crust. Place the pan into a roasting pan. Pour the hot water into the roasting pan so it comes halfway up the cheesecake pan.
- Bake: 50 to 65 minutes. The edges should look set and the center should still wobble slightly. If you see big bubbles or it looks puffy, it’s overbaking. Turn off the oven, crack the door, and let it sit for 45 minutes.
- Cool and chill: Lift the cheesecake out of the water bath, remove the foil, and cool on a rack. Chill at least 6 hours, preferably overnight, before you release the ring. Smooth knife around the edge first.
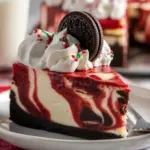
- Finish: Top with whipped cream, chocolate curls, or crushed candy cane. Slice with a warm, thin knife for clean edges.
“I made this for our office party and people still talk about it. The texture was spot on, and it sliced like a dream. I followed the water bath tip and had zero cracks.”
This method gives you that glossy top and the luscious interior you want in a showy holiday dessert. If you’re building a whole dessert spread, you can pair this with fun treats like a holiday trifle or a plate of cookies. And yes, this is my favorite way to serve my Christmas Red Velvet Cheesecake Recipe when family is around the table.
Tips & Tricks
Don’t skip room temp ingredients. Cold cream cheese can create lumpy batter and uneven baking. Pull everything out in advance, even the eggs. If you forget, place the eggs in warm water for 10 minutes to bring them up to temp.
A touch of cocoa is all you need. You’re not making chocolate cheesecake here. Keep the cocoa modest so the red color shines and the tangy cream cheese flavor stays front and center.
Use gel food color. Liquid dyes can change the texture. Gel is concentrated and gives a clean, vibrant red without extra liquid.
Water bath equals creamy. It stabilizes the temperature and prevents the edges from cooking faster than the middle. If water baths make you nervous, you can place a pan of hot water on the rack below as a moisture hack, but the bath around the pan works best.
Cool slowly. Sudden temperature change is the enemy of cheesecake. That little rest in the oven with the door cracked helps the top stay smooth and avoids splitting.
Garnish smart. White chocolate curls or whipped cream really highlight the color. If you want a second dessert that’s simple and festive, this pretty Christmas trifle always disappears fast.
These small decisions are what make this Christmas Red Velvet Cheesecake Recipe a dependable keeper.
How To Store Red Velvet Cheesecake
Chill: Keep the cheesecake in the fridge, covered, for up to 5 days. I like to cover the pan with a plate or use a cake dome so it doesn’t pick up fridge smells.
Freeze whole: Chill overnight, unclip the ring, then freeze uncovered for 1 hour to firm the surface. Wrap in plastic, then in foil, and freeze for up to 2 months. Thaw in the fridge overnight before serving.
Freeze slices: Wrap individual slices well and freeze for 1 to 2 months. This is my favorite way to stash a piece for future me. Thaw in the fridge and serve slightly chilled.
Serve temperature: Cheesecake tastes best slightly chilled, not ice cold. Pull it out 20 to 30 minutes before serving so the flavors bloom. This will keep your Christmas Red Velvet Cheesecake Recipe tasting bakery fresh day after day.
Common Questions
Do I really need the water bath? I highly recommend it. It lowers the chance of cracks and gives you that silky texture. If you skip it, try a pan of hot water on the lower rack to add moisture, and don’t overbake.
What if I’m out of buttermilk? Mix whole milk with a teaspoon of vinegar or lemon juice and let it sit for 5 minutes. It’s not identical, but it works well here.
Which cocoa should I use? Use natural cocoa for the classic red velvet flavor and brighter color. Dutch processed cocoa can make the batter darker and slightly change the flavor.
How can I avoid cracks? Don’t overmix once the eggs go in, bake low and steady, use the water bath, and cool slowly in the turned-off oven with the door cracked. Run a thin knife around the edge after it chills to release it from the sides before you unclasp the ring.
What pairs well with this dessert? Keep it festive with fresh berries, hot coffee, or a bright cocktail like this easy mistletoe margarita. The contrast of tart and sweet is perfect.
Ready to Bake Yours?
Now you’ve got everything you need to make a stunning centerpiece dessert that’s bold, creamy, and holiday ready. This Christmas Red Velvet Cheesecake Recipe looks fancy but stays simple once you follow the steps and keep the chill time in mind. If you like to compare techniques, I also found helpful ideas in this guide for Red Velvet Cheesecake and this fun take from Kitchen Fun With My 3 Sons. I hope you give it a try and feel proud when you slice into that gorgeous red center. Your holiday table is about to glow.
Christmas Red Velvet Cheesecake
Ingredients
Method
- Preheat your oven to 325°F.
- Boil a full kettle of water for the water bath.
- Wrap the outside of the springform pan with two layers of heavy foil.
- Stir cookie crumbs, melted butter, and salt together until it feels like damp sand.
- Press the mixture firmly into the bottom of the pan.
- Bake for 8 minutes, then allow to cool while preparing the filling.
- Mix cream cheese and sugar on medium speed until completely smooth, scraping the bowl to eliminate lumps.
- Add the sour cream and buttermilk, then beat on low until combined.
- Add vanilla, cocoa, and vinegar. Mix just until smooth.
- Incorporate the red gel food color gradually until a deep red is reached.
- Add eggs one at a time on low speed, mixing until combined without overmixing.
- Pour filling into the crust and place the springform pan in the roasting pan.
- Pour hot water into the roasting pan until it reaches halfway up the cheesecake pan.
- Bake for 50 to 65 minutes, until the edges are set but the center wobbles slightly.
- Turn off the oven, crack the door, and let it sit for 45 minutes.
- Lift the cheesecake out of the water bath and remove the foil. Let it cool on a rack.
- Chill for at least 6 hours, preferably overnight, before releasing the ring.
- Top with whipped cream, chocolate curls, or crushed candy cane before serving.
- Slice with a warm, thin knife for clean edges.