
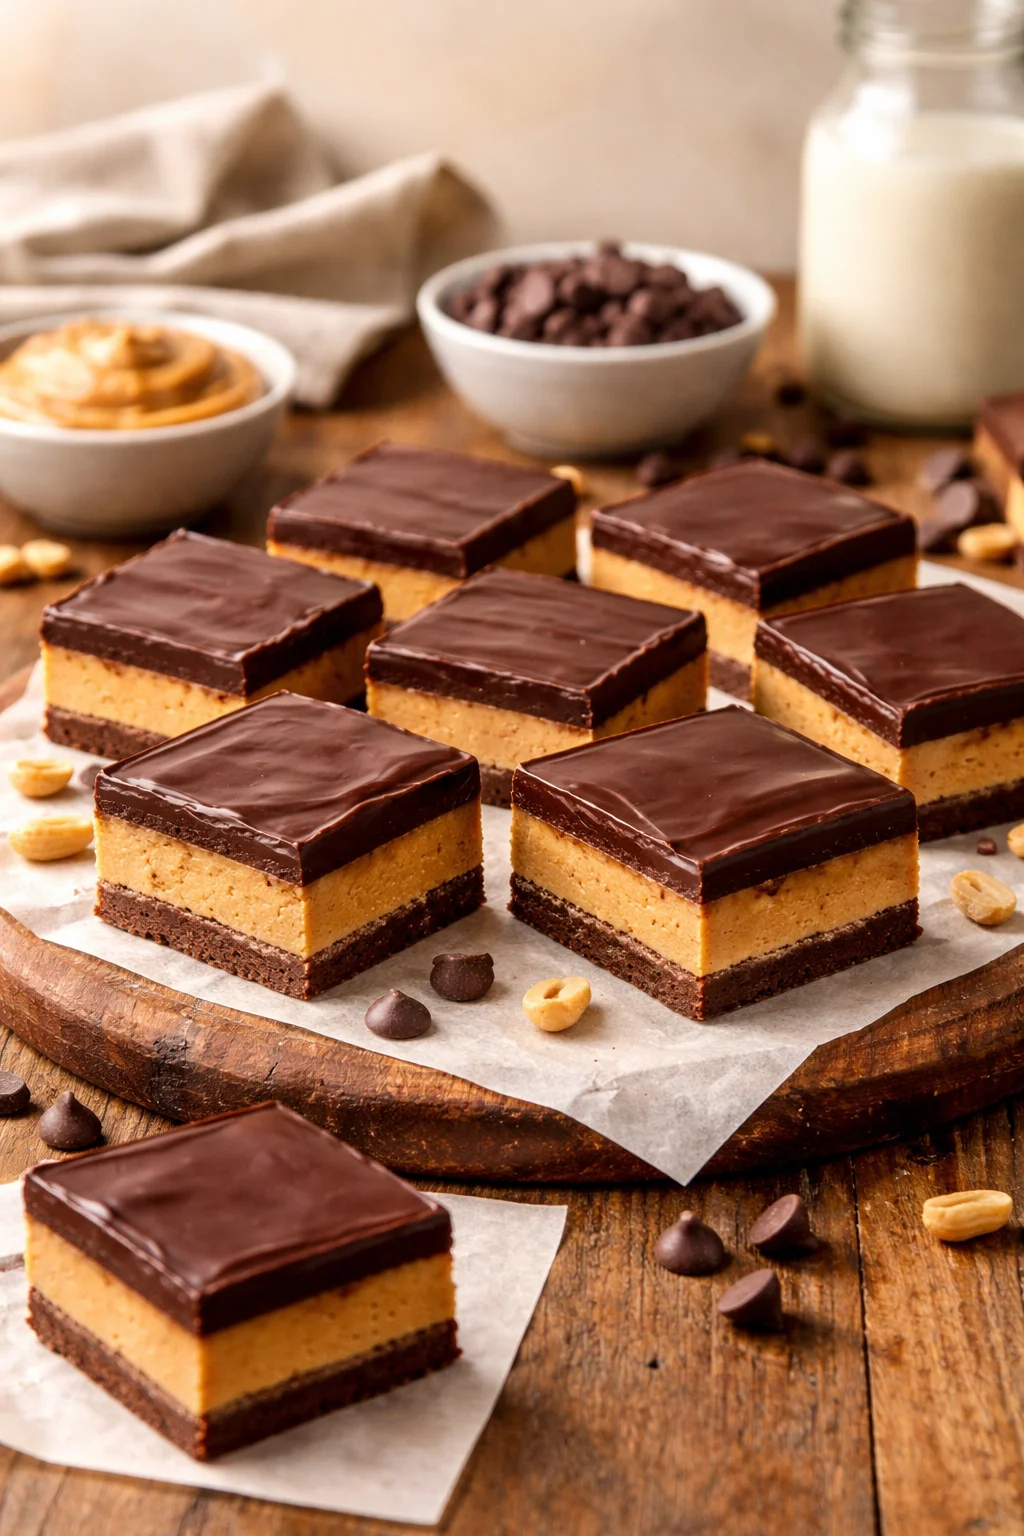
Buckeye Bars are my go to move when I need a dessert that feels a little special, but I do not have the energy for a complicated baking project. You know those days when you want something sweet right now, and you also want it to be worth the calories? That is exactly where these bars shine. They taste like that classic peanut butter and chocolate combo everybody loves, and they slice up into neat little squares that look way fancier than the effort involved. If you have a bowl, a spoon, and a pan, you are already basically there. Let me walk you through how I make them at home, the little tricks I have learned, and a few fun ways to switch them up.
Why You Will Love This Recipe
I have made these for potlucks, family nights, random Tuesdays, and more than one last minute “oh no I forgot I said I would bring dessert” moment. They always disappear fast. The best part is you can get that rich, candy like vibe without needing to babysit an oven.
Here is why this recipe stays on repeat in my kitchen:
- No bake and low stress. Your oven gets the day off.
- Big flavor with simple pantry ingredients.
- They cut clean once chilled, so they are great for sharing.
- They are easy to adjust if you like more chocolate or more peanut butter.
If you are into bite sized versions too, you might also like these buckeye bites. Same vibe, different shape, and honestly perfect for snacky people.
“I brought these to a game night and people kept sneaking back for seconds. One friend literally asked if I bought them from a fancy candy shop.”
How to Make Buckeye Bars
This is the part where I tell you the truth. Buckeye Bars are mostly about mixing, pressing, melting, and waiting. The waiting is the hardest part, but it is also what makes them slice nicely.
Ingredients and what you will need
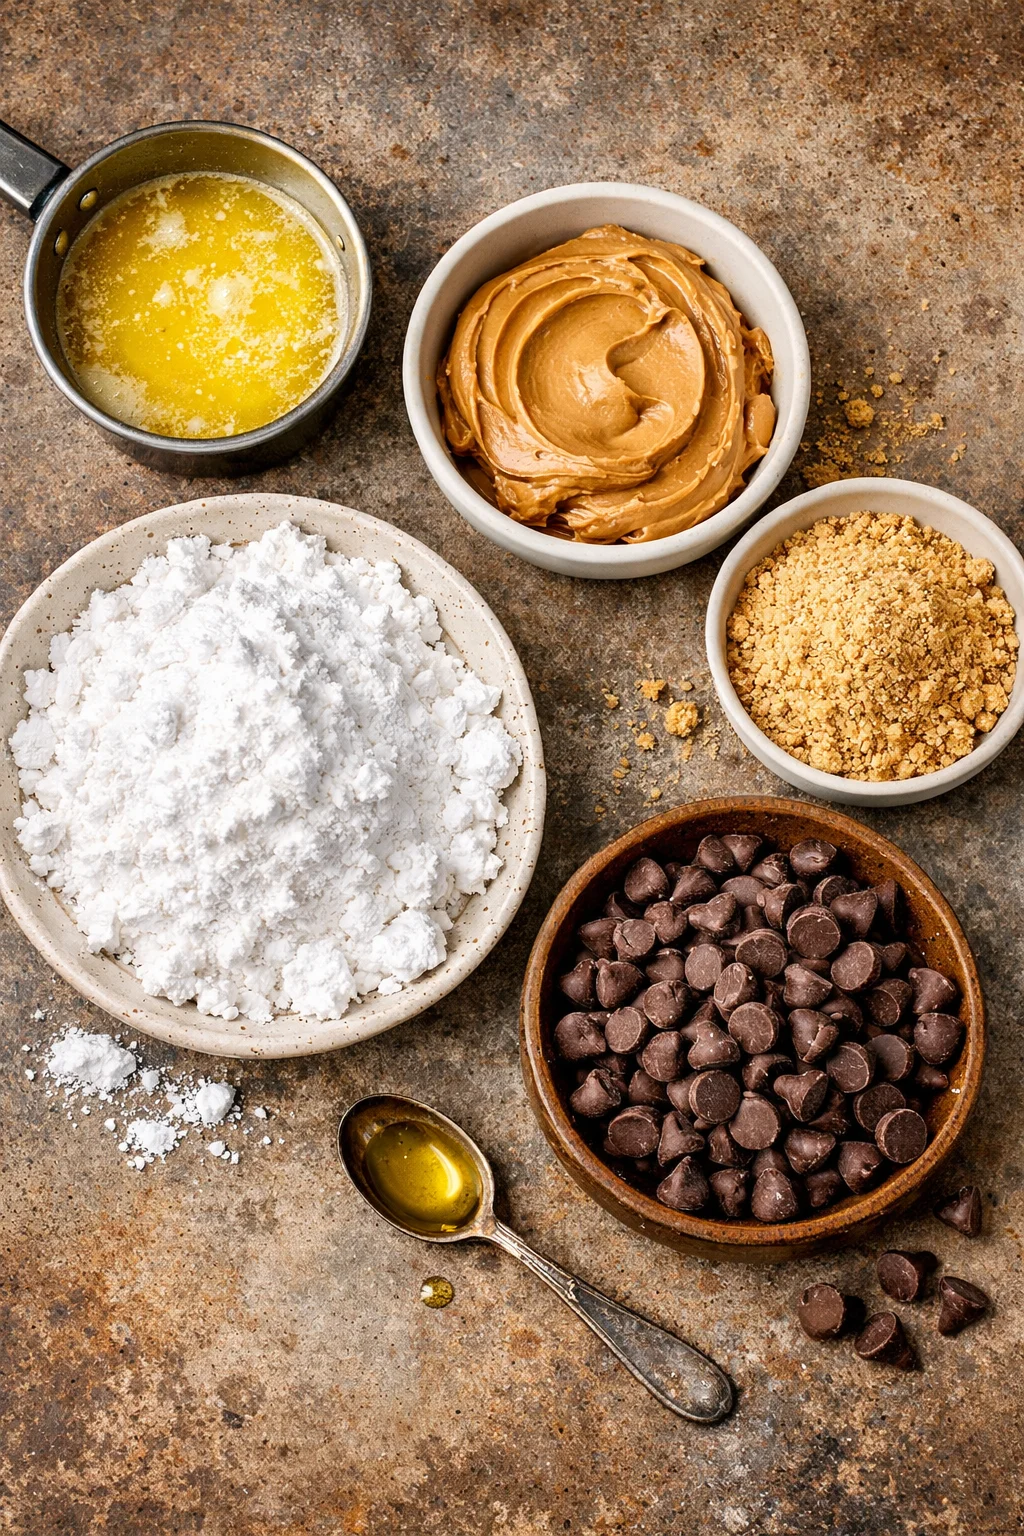
I keep the ingredient list simple and classic. Here is what I use most of the time:
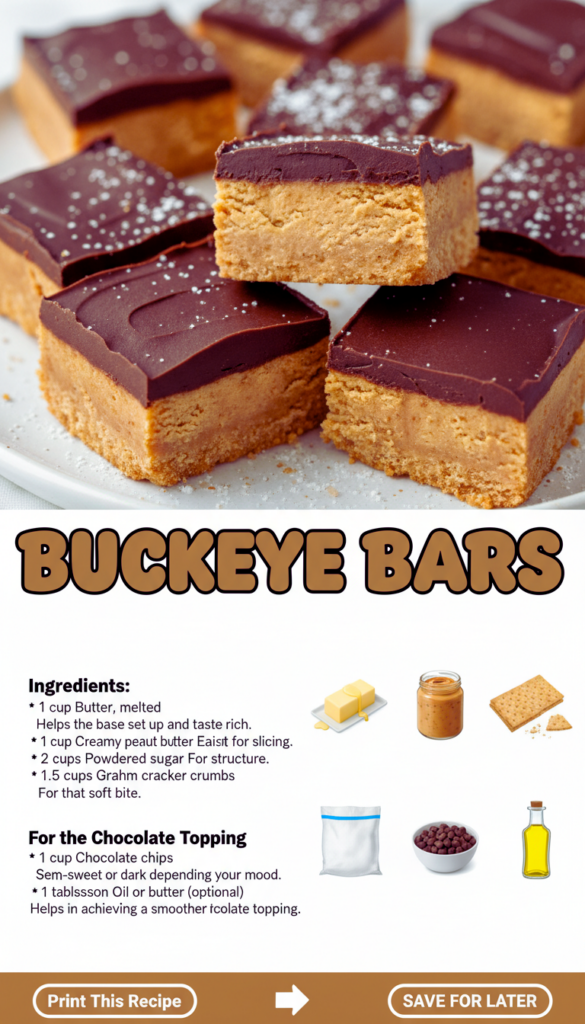
- Butter, melted, to help the base set up and taste rich
- Peanut butter, creamy is easiest for slicing
- Powdered sugar, for structure and sweetness
- Graham cracker crumbs, for that soft bite and a little body
- Chocolate chips, semi sweet or dark depending on your mood
- A small spoon of oil or a tiny bit of butter for the chocolate topping, optional but helpful
You will also need an 8 by 8 or 9 by 9 pan, parchment paper if you want easy lifting, a mixing bowl, and a microwave safe bowl for melting chocolate.
Step by step directions
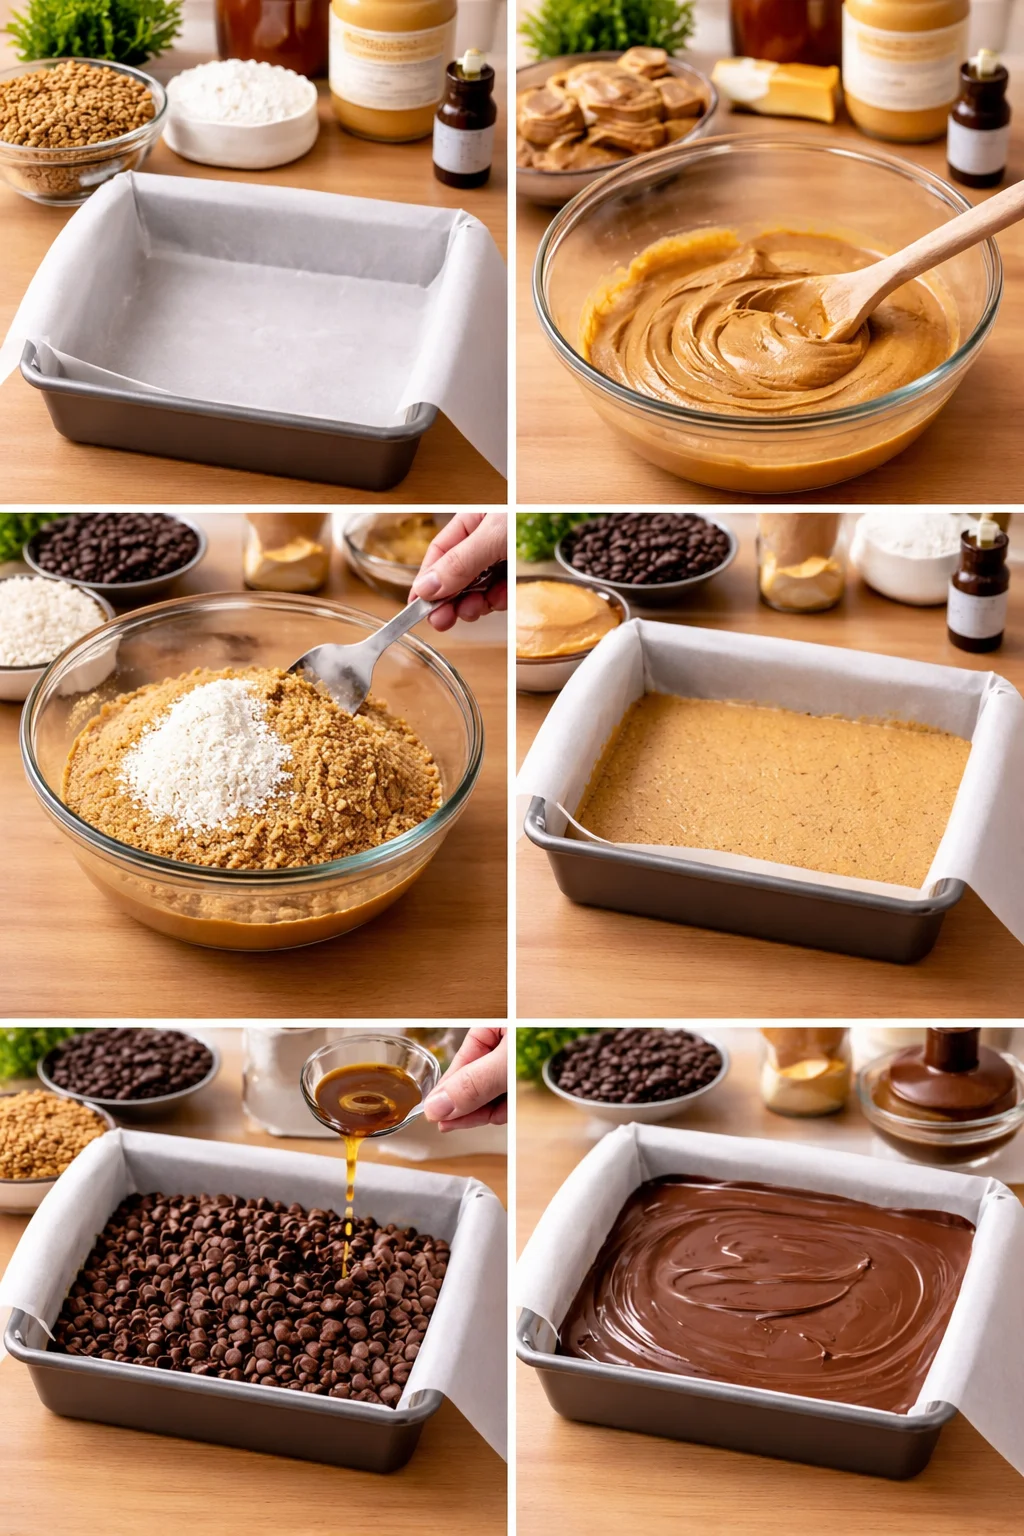
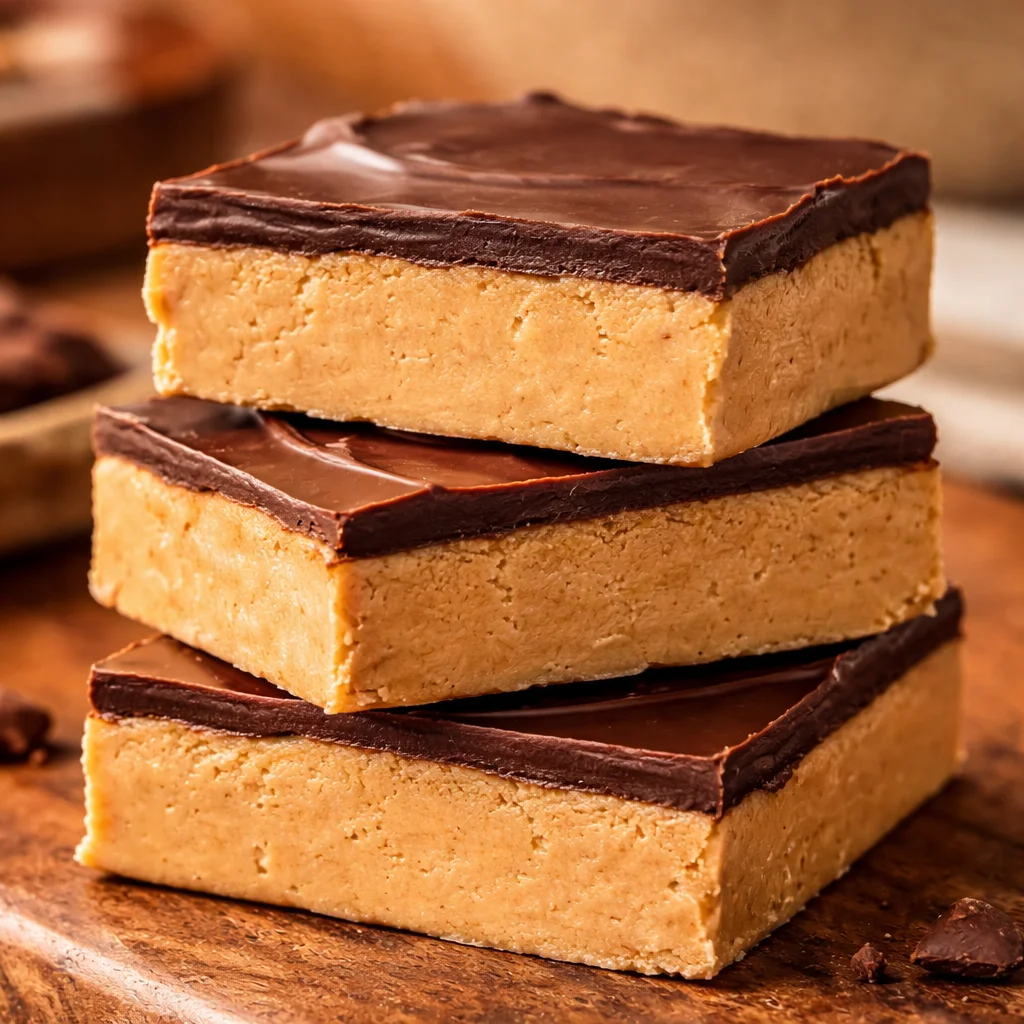
1) Line your pan with parchment paper if you can. It makes removing the bars so much easier. If you skip it, just grease the pan well.
2) In a big bowl, mix melted butter and peanut butter until smooth. Then stir in powdered sugar and graham cracker crumbs. It will look a little crumbly at first, then it comes together into a thick dough.
3) Press that mixture into your pan. Press firmly and evenly. I use the bottom of a measuring cup to really pack it in.
4) Melt your chocolate chips. I microwave in short bursts and stir in between so it does not scorch. If you want a smoother top, add a small spoon of oil or butter to the chocolate before spreading.
5) Spread the melted chocolate on top of the peanut butter layer. Try to get it to the edges so every bite has chocolate.
6) Chill until firm. I usually do at least 1 to 2 hours in the fridge. Then slice and serve.
One little tip for slicing: let the bars sit out for about 5 minutes before cutting. If the chocolate is super cold, it can crack. A warm knife helps too.
Also, I am adding this here because it helps if you are sharing the recipe on a site or saving it for later: ;
If you are on a crumb bar kick lately, I totally get it. These chocolate raspberry crumb bars are a different vibe, but still that easy to slice, easy to share kind of dessert.
Expert Tips
I am not a professional pastry chef, but I have made Buckeye Bars enough times to know what can go a little weird, and how to fix it fast. Here are my tried and true tips.
Use the right peanut butter. If you use a super natural peanut butter that separates a lot, the base can turn oily or not set as firmly. It can still work, but you may need a little more powdered sugar or crumbs to balance it.
Pack the base firmly. This is not the time for a gentle touch. A compact base means clean slices that do not crumble apart when you pick them up.
Go slow with melting chocolate. Chocolate burns fast. Short microwave bursts and lots of stirring makes a big difference in how glossy the topping looks.
Chill long enough. If you cut too early, the middle can be soft and the top can slide. Give it time. This is where the magic happens.
Storage tip. I keep them in a sealed container in the fridge. They are great cold, and they stay firm. If you like a softer bite, let your piece sit on the counter for a few minutes before eating.
If you love that sweet and salty thing like I do, these dark chocolate sea salt nut bars are another good one to keep in your back pocket for snack cravings.
Buckeye Bar Variations
Once you get the basic version down, it is honestly hard not to start playing around. Buckeye Bars are super forgiving, so you can tweak them to match your pantry or your mood.
Make them extra chocolatey: Mix mini chocolate chips into the peanut butter layer, then top with the regular chocolate layer.
Make them more salty: Sprinkle flaky salt on top right after you spread the chocolate. It sticks best before the chocolate sets.
Try crunchy peanut butter: It adds texture and makes them feel even more like candy.
Swap the crumbs: If you do not have graham cracker crumbs, you can use crushed vanilla wafers. It changes the flavor slightly, but it still works.
Add a drizzle: A thin peanut butter drizzle on top looks cute and takes almost no extra effort. Warm the peanut butter slightly so it drizzles instead of clumps.
These variations keep the spirit of Buckeye Bars, but let you personalize them. If you are making them for kids, I usually keep it classic. If it is for adults, that little salt on top is a win.
More No-Bake Recipes
Once you make a no bake dessert that actually tastes amazing, it is kind of hard to go back. I like having a few options depending on what I am craving or what I need to bring somewhere.
If you want more bars with that snacky, shareable vibe, check out these no bake strawberry cheesecake bars. They are creamy and bright, and they feel like spring and summer in dessert form.
And if you are the person who loves a candy bar style treat, I also keep recipes like nutty bars and caramel style bars in rotation. They are great for parties, but also great for hiding in the fridge for a little after dinner sweet.
Common Questions
Can I freeze Buckeye Bars?
Yes. Slice them first, then freeze in a sealed container with parchment between layers. Let a piece sit out for 10 to 15 minutes before eating so the chocolate is not rock hard.
Why did my chocolate topping crack when I cut it?
Usually it is because the bars were very cold. Let them sit at room temp for a few minutes and use a warm knife. That helps a lot.
Do I have to use graham cracker crumbs?
No, but they help the base hold together. Vanilla wafer crumbs work, and even finely crushed digestive biscuits work too.
How long do they last?
In the fridge, I think they are best within 5 to 7 days. In the freezer, they can go a couple of months if sealed well.
Can I make them in a bigger pan?
Yes, but they will be thinner. If you use a 9 by 13 pan, I recommend doubling the recipe so you still get that thick peanut butter layer.
A Sweet Little Wrap Up
If you need an easy treat that gets real excitement from people, Buckeye Bars are it. They are simple, they travel well, and they hit that perfect peanut butter plus chocolate craving without any baking drama. If you want to compare methods or see other takes, I have bookmarked Easy No-Bake Buckeye Bars (5 Ingredients!) – A Joyfully Mad Kitchen and also this helpful version from Peanut Butter Chocolate Bars (Buckeye Bars) – Glorious Treats. Now go grab that peanut butter and chocolate and make a batch, because you deserve an easy win in the kitchen this week.
Buckeye Bars
Ingredients
Method
- Line your pan (8×8 or 9×9) with parchment paper for easy removal.
- In a big bowl, mix melted butter and peanut butter until smooth.
- Stir in powdered sugar and graham cracker crumbs until it forms a thick dough.
- Press the mixture into your lined pan firmly and evenly.
- Melt the chocolate chips in a microwave-safe bowl in short bursts, stirring in between.
- If desired, add oil or butter to the melted chocolate for a smoother texture.
- Spread the melted chocolate over the peanut butter layer, reaching the edges.
- Chill in the refrigerator for at least 1 to 2 hours until firm.
- Let the bars sit at room temperature for 5 minutes before slicing for clean cuts.
- Slice into squares and serve.