

Candy Cane Kiss Cookies are what I reach for when I want a festive treat without a ton of effort. They look bright and cheery on any cookie platter, and they bring that minty holiday vibe that gets everyone hovering near the kitchen. If you’ve ever tried to balance crisp edges with a soft, tender center, you know the struggle is real. These are sweet, minty, and playful, and they always disappear first at parties. I’ll walk you through exactly how I make them at home, with all the tiny tricks that keep the chocolate from melting and the cookies perfectly chewy. Let’s do it together, one tray at a time.
Candy Cane Version of Peanut Butter Blossoms
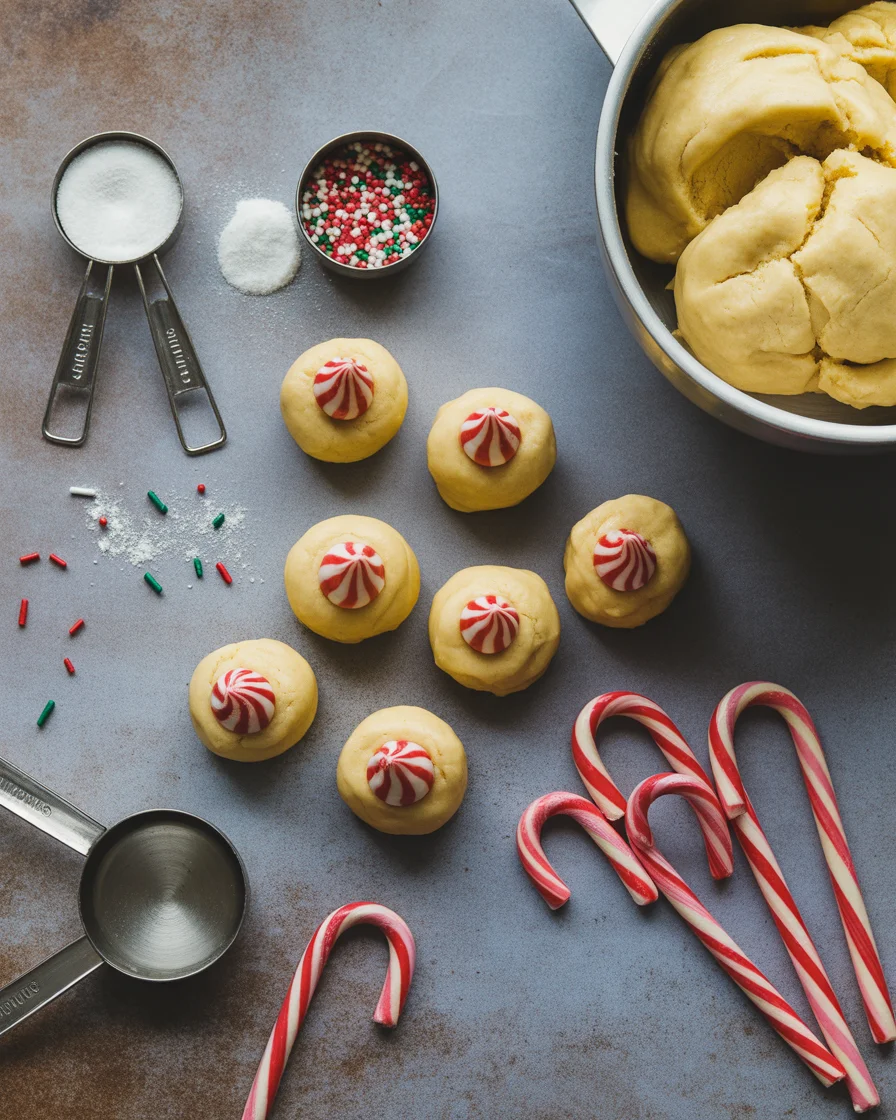
You know those peanut butter blossoms that show up at every cookie swap? This is the holiday cousin. The peanut butter base gets swapped for a buttery vanilla dough that’s soft in the middle and lightly crisp at the edges. Instead of a chocolate kiss, we nestle a candy cane Hershey’s Kiss on top. The result is a pretty swirl of red and white with a gentle peppermint pop.
I like to fold a spoonful of crushed candy canes or peppermint crunch into the dough for extra bursts of mint. It makes each bite a little exciting, and it gives the cookies those tiny pink flecks that look like confetti. If you want to go full peppermint party, roll the dough balls in coarse sugar before baking. The sugar gives a sparkly finish and a faint crunch that plays so nicely with the soft center.
Craving more minty cookies? I’ve also got a fun spin linked here if you want to explore a different texture: Deliciously Magical Candy Cane Cookies. They’re a great companion on a dessert tray.

Here’s Why You’ll Love Them
These are cozy, colorful, and straightforward. The dough is simple and forgiving, and you don’t need fancy tools. The peppermint Kiss looks adorable and sets like a tiny hat on top of each cookie. That soft chew is the real hook though. It’s the kind of cookie you eat standing at the counter while “taste testing” a second one, just to be sure.
Texture matters. A little bit of chill time helps the dough bake up thick and tender. The chocolate sets nice and smooth if you let the cookies rest a minute or two before adding the Kiss. The result is tidy, not messy, and the swirl stays intact.
If you like switching up holiday flavors, check out these cute seasonal siblings too: Gingerbread Kiss Cookies. Same idea, different vibe.
“I brought a batch of these to my kid’s class and not a single one came home. A couple of parents asked me for the recipe on the spot. They’re festive, not too minty, and perfectly chewy.”
Best Way to Make Candy Cane Kiss Cookies
Here’s my friendly, no-stress method that gets reliable results every time. I’ll keep it simple and clear, with the little steps that make a big difference.
What you’ll need
- 1 cup unsalted butter, softened
- 1 cup granulated sugar
- 1 large egg, room temperature
- 2 teaspoons vanilla extract
- 2 and 1/4 cups all-purpose flour, spooned and leveled
- 1 teaspoon baking powder
- 1/2 teaspoon fine salt
- 1/3 cup finely crushed candy canes or peppermint baking chips
- About 36 candy cane Hershey’s Kisses, unwrapped
- Optional: 1 tablespoon milk if dough seems dry
- Optional: coarse sugar for rolling
Directions
- Cream butter and sugar until fluffy, about 2 minutes. Add egg and vanilla, and mix until smooth.
- Whisk flour, baking powder, and salt in a separate bowl. Add dry ingredients to the wet, mixing on low until just combined.
- Fold in crushed candy canes. If the dough feels crumbly, add milk, 1 teaspoon at a time, until it holds together.
- Chill the dough for 30 to 45 minutes. This keeps the cookies thick and chewy.
- Preheat oven to 350 F. Line two baking sheets with parchment.
- Scoop 1 tablespoon portions, roll into balls, and, if using, roll in coarse sugar.
- Bake 8 to 10 minutes, until the edges look set and the tops are puffy but still pale. Do not overbake.
- Let the cookies rest on the sheet for 2 minutes. Then press the Kiss gently into the center of each cookie.
- Move the sheets to the fridge for 10 minutes to help the Kisses set and keep their swirl. Then transfer cookies to a rack to cool completely.
Want to dress them up for a cookie tray? A little swirl of frosting on a few cookies looks cute next to the Kisses. Try this sturdy favorite: Buttercream Frosting for Cookies That Hardens. Just pipe a tiny ring under the Kiss for extra sweetness and a bakery-style look.
A quick note on Kisses: unwrap them before the cookies go in the oven. Keep them in the fridge while you bake so they’re extra firm when you press them in. That tiny step really helps the shape hold.
3 Success Tips
- Chill, then bake: Warm dough spreads, chilled dough holds. Even 30 minutes of chill time makes a big difference in shape and chew.
- Press, then cool fast: Press the Kisses after a short 2 minute rest, then chill the sheet. That quick cool down keeps the swirl neat and prevents melting.
- Pull them early: Take the cookies out when the edges look set but the tops are still pale. They’ll finish on the sheet and stay soft inside.
If your kitchen runs warm, try baking one test cookie. If it spreads too much, chill the scooped dough balls for 10 extra minutes and try again. It’s a simple fix that saves a whole batch.
Dietary Guide
Gluten free: Use a quality 1 to 1 gluten free flour blend that includes xanthan gum. The dough might need an extra teaspoon or two of milk to help it come together. Bake time stays the same. Let them cool fully for the best texture.
Dairy free: Swap butter with a plant based stick butter that’s made for baking. For the topping, use dairy free peppermint bark, chopped into squares, or a dairy free white chocolate wafer. Set the square on top while the cookie is warm, then chill to set.
Egg free: A flax egg works here. Mix 1 tablespoon ground flax with 3 tablespoons water, let it gel for 5 minutes, then add to the dough. The cookies will be slightly denser but still tasty and cheerful.
Lower sugar: Roll in plain granulated sugar instead of coarse, and skip the added candy cane bits. You’ll still get that minty finish from the Kiss on top.
Planning a cookie assortment for a party? Pair these with something buttery and classic like Christmas Pinwheel Cookies to add color and variety. The mix of mint and simple vanilla is a crowd pleaser.
Common Questions
Can I make the dough ahead?
Yes. Chill the dough up to 3 days, tightly covered. Let it sit at room temp for 10 minutes if it feels too firm to scoop.
How do I keep the Kisses from melting?
Press them into the cookies after a 2 minute rest, then move the sheet straight to the fridge for about 10 minutes. Cold Kisses help too.
Can I freeze the cookies?
Absolutely. Freeze the baked cookies in a single layer, then stack in a container with parchment between layers. Thaw uncovered at room temp. Candy Cane Kiss Cookies hold up nicely this way.
What size scoop should I use?
A 1 tablespoon scoop is perfect. It gives you bite-size cookies that bake evenly and leave enough room for the Kiss.
Do I need to roll them in sugar?
No, but it adds sparkle and a little crunch. If you skip it, the cookies will still be sweet and soft.
Ready to Bake a Batch of Joy
When I need something easy, festive, and guaranteed to disappear, I reach for Candy Cane Kiss Cookies. The dough is simple, the swirl is adorable, and that peppermint finish just feels like the holidays. If you want more reference points or extra tips, I love how Candy Cane Kiss Cookies are explained on Sally’s Baking Addiction, and Recipe Girl’s take on Candy Cane Kiss Cookies offers helpful step by step visuals too. I hope you’ll try a batch, share a plate, and keep a few for yourself. You deserve a cookie break.


Candy Cane Kiss Cookies
Ingredients
Method
- Cream butter and sugar until fluffy, about 2 minutes.
- Add egg and vanilla, and mix until smooth.
- Whisk flour, baking powder, and salt in a separate bowl.
- Add dry ingredients to the wet, mixing on low until just combined.
- Fold in crushed candy canes. If the dough feels crumbly, add milk, 1 teaspoon at a time, until it holds together.
- Chill the dough for 30 to 45 minutes.
- Preheat oven to 350°F (175°C).
- Line two baking sheets with parchment.
- Scoop 1 tablespoon portions, roll into balls, and roll in coarse sugar if using.
- Bake for 8 to 10 minutes, until edges look set and tops are puffy but still pale.
- Let cookies rest on the sheet for 2 minutes, then press a Kiss gently into the center of each cookie.
- Move sheets to the fridge for 10 minutes to help Kisses set.
- Transfer cookies to a rack to cool completely.