
No-bake Bunny Bark is my go to move when I need something cute, sweet, and fast, but I do not want to turn my kitchen into a disaster zone. You know those moments when you suddenly remember you promised to bring a treat to school, work, or a family thing? This is for that. It looks like you spent way more time than you did, and people always ask for the recipe. Plus, it is a fun one to make with kids because there is a lot of sprinkling and “decorating decisions” happening. Let me walk you through exactly how I make it so it turns out pretty every time.
What is Bunny Bark?
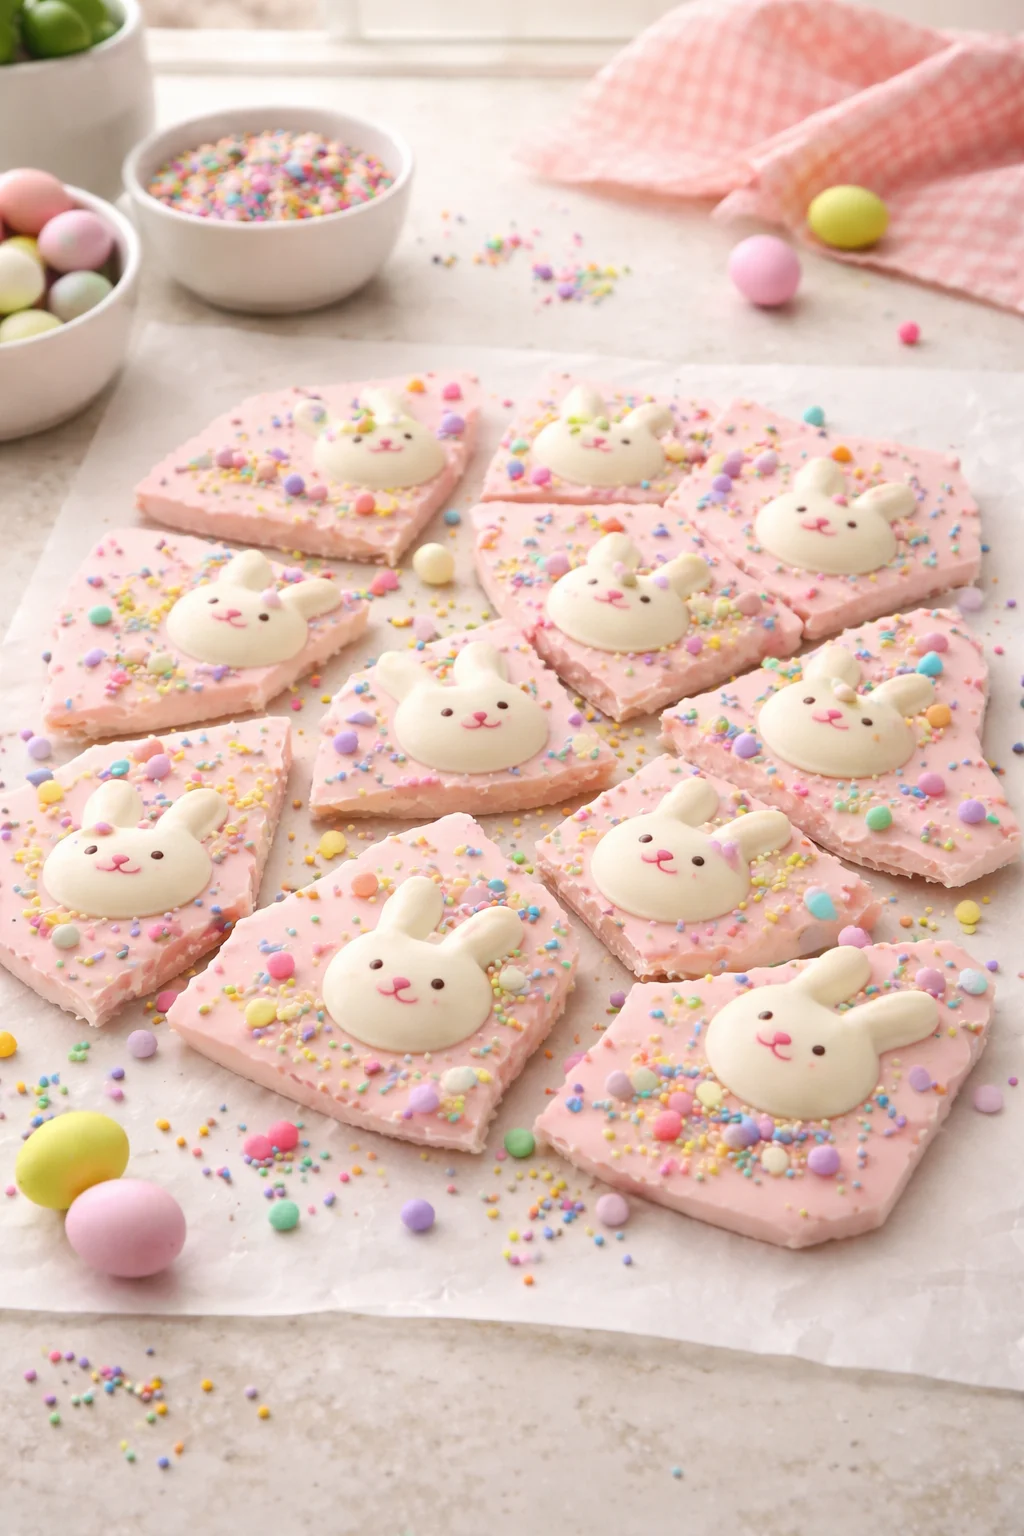
Bunny bark is basically a spring themed chocolate bark that you break into pieces once it sets. Think of it like a candy “sheet” covered in pastel toppings, mini marshmallows, sprinkles, and anything else that feels Easter-ish. The reason I love it is because there is no baking, no mixer, no complicated steps, and it still feels special.
It is also super flexible. You can keep it simple with just melted chocolate and a few candies, or you can go full craft mode and add layers, swirls, and extra textures. If you are already into bark recipes, you might also like this one for another holiday vibe: deliciously easy Christmas chocolate bark you will love. Same easy idea, different colors.
And just to set expectations, No-bake Bunny Bark is not supposed to look “perfect.” It is supposed to look playful and homemade in the best way, like something you would be excited to grab off a dessert table.
Essential Ingredients for Bunny Bark
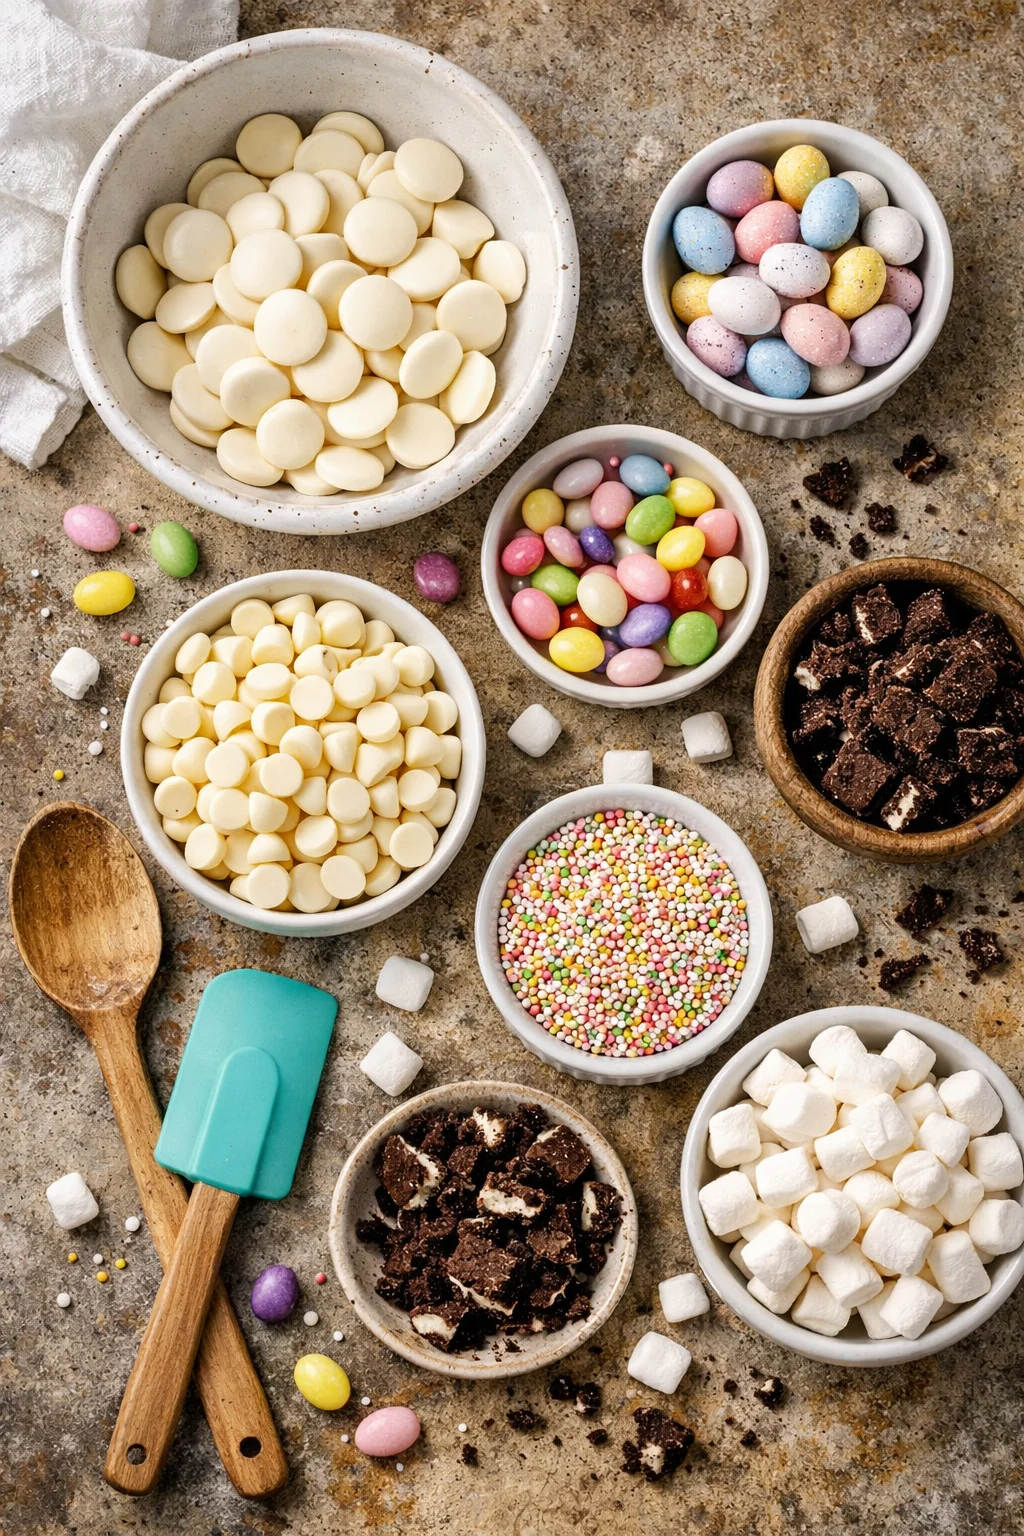
This is one of those recipes where the ingredient list looks simple, but the choices matter. The biggest thing is using chocolate that melts smoothly. I usually do a mix of white chocolate (for the bunny look) plus a little pastel color, but you can absolutely use milk or dark chocolate too.
What you will need
- White chocolate chips, melting wafers, or chopped white chocolate bars
- A tiny bit of neutral oil (optional, only if your chocolate is thick)
- Pastel candies (mini eggs, candy coated chocolates, jelly beans)
- Mini marshmallows (regular or the fun pastel ones)
- Sprinkles (nonpareils, confetti, or bunny shapes if you find them)
- Crushed cookies or pretzels (optional for crunch)
- Pinch of salt (optional but honestly helpful)
I keep a little “bark bin” in my pantry with sprinkles and random toppings, so I can throw this together anytime. If you like easy no bake desserts in general, you might also want to peek at easy no bake lemon eclair cake for a totally different kind of crowd pleaser.
One more ingredient tip: if you are coloring white chocolate, use oil based or candy coloring if you can. Regular liquid food coloring can make chocolate seize and get weird and clumpy. If you have only regular food coloring, skip it and use pastel toppings to bring the color instead. It will still look adorable.
Step-by-Step Instructions for Making Bunny Bark
This is the part where you can relax. No oven, no timers you have to stress about, just melt, spread, sprinkle, and chill.
My simple method (that actually works)
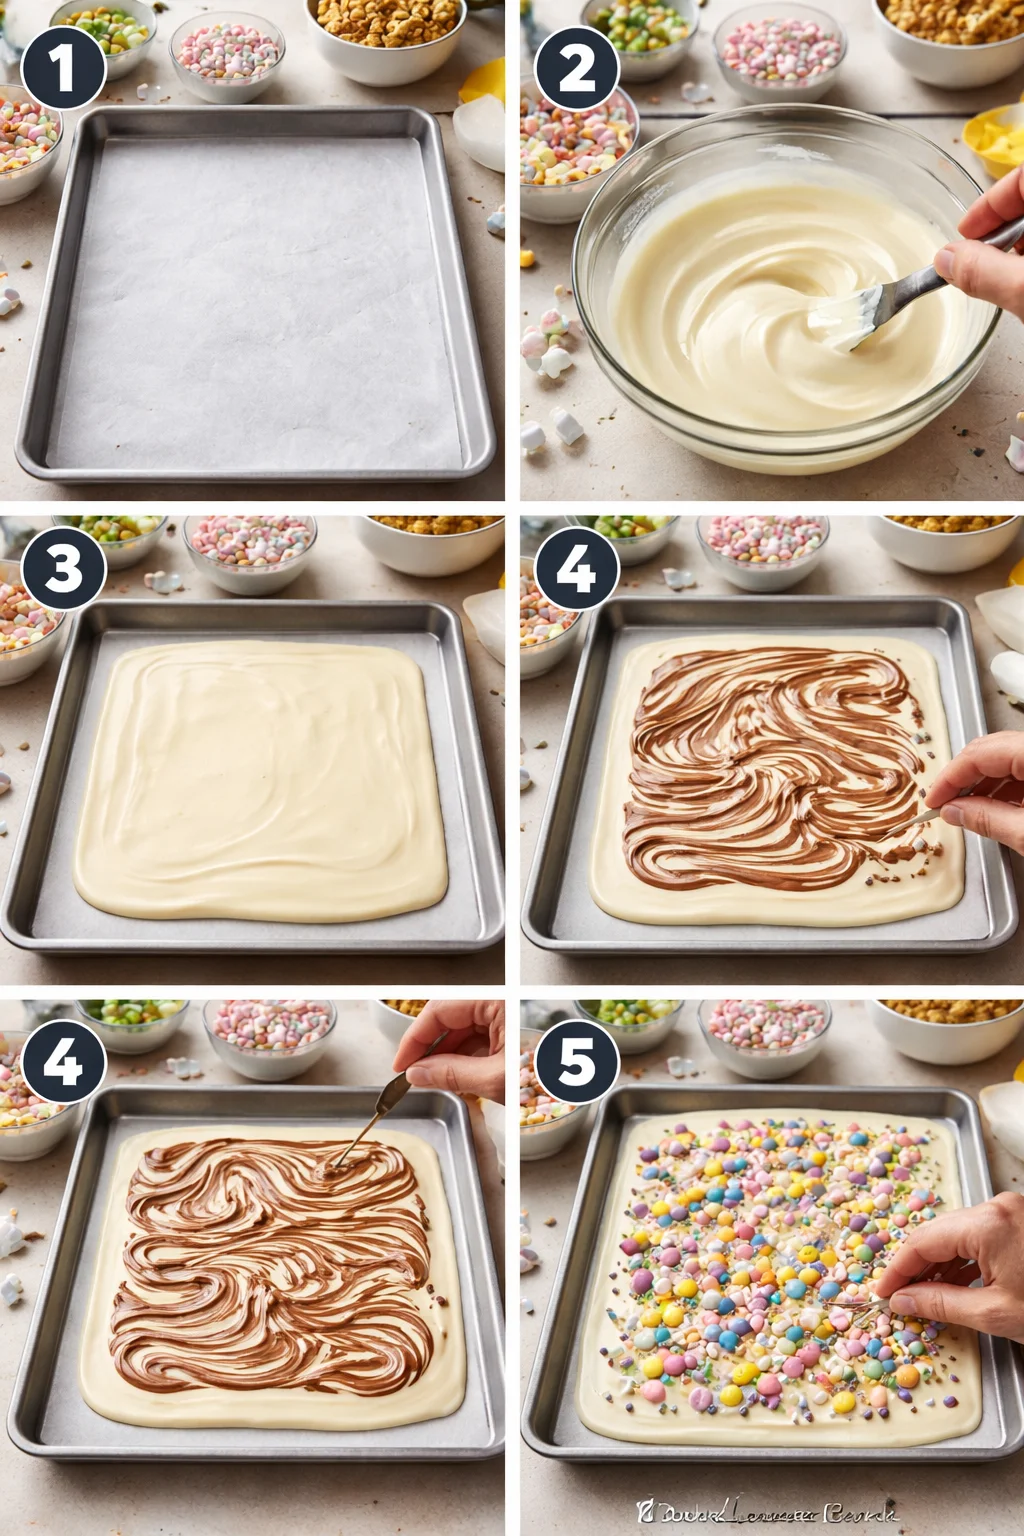
- Line a sheet pan with parchment paper. This is non negotiable unless you enjoy scraping chocolate off trays.
- Melt the chocolate in the microwave in 20 to 30 second bursts, stirring each time. Stop when it is mostly melted, then stir until smooth. If it looks thick, add 1 teaspoon of neutral oil and stir.
- Spread it out into a rough rectangle. I do about 1/4 inch thick, not too thin or it snaps into tiny shards.
- Add swirls if you want. Sometimes I drizzle a little melted milk chocolate on top and use a toothpick to swirl it. Pretty with almost no effort.
- Decorate fast while the chocolate is still wet. Add candies, marshmallows, sprinkles, and anything crunchy.
- Lightly press toppings down with clean fingers so they stick.
- Chill in the fridge for 20 to 30 minutes until firm.
- Break into pieces with your hands. I like uneven chunks because it looks more natural.
My biggest lesson learned: once the chocolate starts setting, toppings will bounce right off. So have everything opened and ready before you melt anything. I set toppings in little bowls like I am hosting a tiny candy buffet.
“I made this for my kids class party and the tray disappeared in minutes. Even the parents were hovering. It was so easy I felt like I was cheating.”
If you are on a chocolate kick lately, this is another bark recipe I love when I want that sweet and salty thing: irresistible dark chocolate peanut butter bark recipe to try. Totally different vibe, same low effort payoff.
Creative Variations of Bunny Bark
The fun part about No-bake Bunny Bark is you can make it match whoever you are making it for. More chocolatey, more crunchy, more pastel, less pastel, you get the idea.
Here are a few variations I have actually tried and liked:
1) Cookies and cream bunny bark
Mix crushed sandwich cookies into the white chocolate, then top with mini eggs. It tastes like an Easter version of cookies and cream candy.
2) Strawberry shortcake style
Use freeze dried strawberries crushed on top plus vanilla candy pieces. It looks pretty and tastes bright and sweet.
3) Salty snack bunny bark
Add crushed pretzels and a tiny pinch of salt. The salty crunch makes the sweet chocolate pop.
4) Pastel swirl bark
Divide melted white chocolate into two or three bowls and tint lightly with pastel candy coloring. Dollop colors on the parchment and swirl with a toothpick. It looks fancy with basically zero added work.
If you want another no bake treat that is easy to portion and serve, I also love these little cups: delicious no bake gingerbread cheesecake cups recipe. Not Easter themed, but the no bake energy is the same.
Tips for Decorating and Presenting Bunny Bark
This is where you can make it look like it came from a cute little bakery, even if you made it in sweatpants. Presentation really does matter with bark because it is so simple, so the toppings are the whole look.
My best decorating tips:
Go bigger with a few statement toppings
Instead of covering every inch with sprinkles, place a few bigger pieces like mini eggs, bunny shaped candies, or marshmallows, then fill gaps with sprinkles.
Use two textures
Something crunchy plus something chewy makes it feel more snackable. Pretzels and marshmallows are an easy combo.
Do not overload the chocolate
If you pile toppings too high, the bark breaks weird and the chocolate underneath can crack off. Keep it in a single layer with a little overlap.
Break it after it is fully set
If it is still a little soft, it bends and you get smudgy fingerprints. Been there.
Packaging idea
If you are gifting it, put pieces in a clear bag with a ribbon, or stack them in a mason jar with parchment between layers. It holds up well and looks festive.
Common Questions
Can I make No-bake Bunny Bark ahead of time?
Yes. I usually make it 1 to 3 days ahead. Keep it in an airtight container in the fridge so it stays snappy and the toppings stay fresh.
How do I store it so it does not get sticky?
Moisture is the enemy. Store it airtight, and if your kitchen is warm, keep it in the fridge. Let it sit out for 5 minutes before serving so it is not ice cold.
What is the best chocolate to use?
Melting wafers are the easiest for beginners because they melt smoothly. Good white chocolate bars also work great. If you use chips, they sometimes melt thicker, so you might need a tiny bit of oil.
Can I make it without food coloring?
Absolutely. Just use white chocolate and rely on pastel toppings for color. It still reads “Easter” right away.
Why did my chocolate seize up?
Most common cause is water or steam getting into the bowl, or using regular liquid coloring. Make sure bowls and spoons are fully dry and use candy coloring if you tint it.
A sweet little wrap up (and a nudge to try it)
No-bake Bunny Bark is one of those simple recipes that saves the day when you need a fun treat fast, and it is honestly just as enjoyable to make as it is to eat. Keep your toppings ready, melt your chocolate gently, and do not overthink the design because the messy cute look is part of the charm. If you want more spring inspiration, I love this Easy Easter Bark (A Quick and Colorful Spring Treat) – Sprinkle Bakes and this A Quick & Easy No-Bake Treat: Easter Bunny Bark! because they are full of fun topping ideas. Make a batch, put on some music, and let yourself have a little playful kitchen moment. You will be shocked how fast it disappears. 

No-bake Bunny Bark
Ingredients
Method
- Line a sheet pan with parchment paper.
- Melt the chocolate in the microwave in 20 to 30 second bursts, stirring until smooth.
- If the chocolate looks thick, add 1 teaspoon of neutral oil and stir.
- Spread the melted chocolate into a rough rectangle, about 1/4 inch thick.
- Add swirls if desired by drizzling melted milk chocolate and swirling with a toothpick.
- While the chocolate is still wet, quickly add candies, marshmallows, sprinkles, and any other toppings.
- Lightly press the toppings down with clean fingers.
- Chill in the fridge for 20 to 30 minutes until firm.
- Break into uneven pieces with your hands to serve.