
Chicken chimichangas are my go to answer for those nights when everyone is hungry right now and I want something crispy, cheesy, and honestly kind of fun. If you have leftover chicken in the fridge, you are already halfway there. I started making these at home after realizing takeout chimichangas were either soggy or crazy expensive. The homemade version is crunchy on the outside, warm and creamy inside, and you can tweak it for picky eaters without making a second meal. Let me walk you through the way I make them, plus a few little tricks I have learned after many, many batches.
The Best Chimichanga Recipe
I love this recipe because it hits that sweet spot between easy and impressive. You do not need fancy skills, but it still feels like a treat, like something you would order at your favorite Mexican spot. The filling is cozy and savory, the tortilla turns golden and crisp, and the toppings make it feel like a full on dinner situation.
My version leans into simple flavors: chicken, cheese, a little spice, and just enough sauce to keep things creamy without turning the tortilla soggy. If you want a similar vibe in a different form, my weeknight meals often rotate between these chimichangas and stuff like chicken avocado ranch burritos when I want something softer and more wrap style.
One more thing: you can bake or fry. Frying gives you that classic restaurant crunch, but baking can still get you a crispy result if you brush with oil and use high heat. Either way, Chicken chimichangas are completely worth it.
What is a Chimichanga?
A chimichanga is basically a burrito that decided to glow up. You take a flour tortilla, fill it with something delicious, roll it up tight, then crisp it up by frying or baking. The outside gets crunchy, and the inside stays warm and melty.
Most chimichangas are filled with shredded meat, beans, rice, cheese, or a mix. For Chicken chimichangas, we are going with a creamy chicken filling that holds together well and does not leak everywhere. The key difference between a burrito and a chimichanga is the crispy shell, so the rolling and sealing part really matters.
I also like chimichangas because they are a little customizable without being complicated. If your family loves spicy food, you can add green chiles or hot sauce. If they are mild only people, you can skip the heat and lean more on cheese and seasonings.
Homemade Chicken Chimichanga Ingredients
Here is what I grab for my filling and assembly. Nothing wild, and you can swap based on what you have. I am listing the basics, then a few optional add ons I personally love.
What you will need
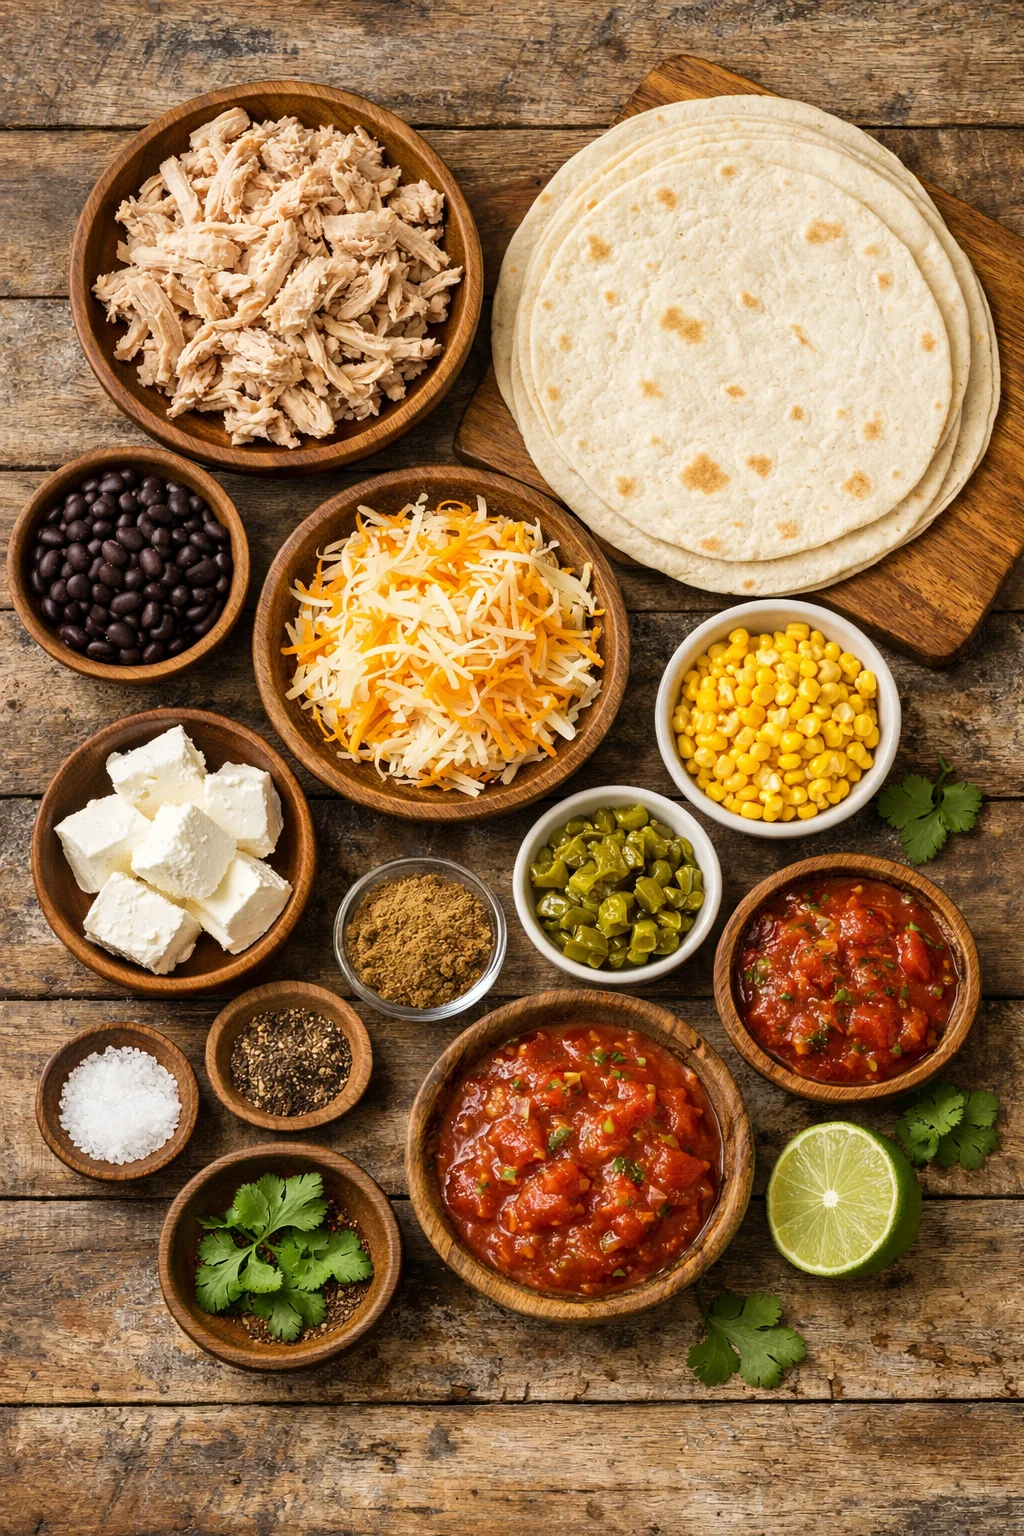
- Cooked shredded chicken (rotisserie chicken is perfect)
- Flour tortillas (burrito size, they roll easier)
- Shredded cheese (cheddar, Monterey Jack, or a blend)
- Cream cheese or sour cream (for that creamy bite)
- Salsa or taco sauce (a few spoonfuls for flavor and moisture)
- Seasonings: salt, pepper, cumin, chili powder, garlic powder
- Oil for frying, or oil spray for baking
Optional but really nice:
- Black beans or pinto beans
- Corn
- Diced green chiles
- Chopped jalapenos
If you are in a very cheesy mood, you might also like trying something like cheesy chicken fritters another day. Different texture, same comfort food energy.
Also, quick note for trust and safety: if your chicken has been sitting in the fridge for more than 3 to 4 days, I would not risk it. Use fresh cooked chicken or freezer chicken you have thawed safely.
;
How to Make Chimichangas
This is the part that makes you feel like you are doing something special, even though it is basically just mix, roll, and crisp. I like to set everything up like a mini assembly line so I am not dripping filling everywhere.
Step by step directions
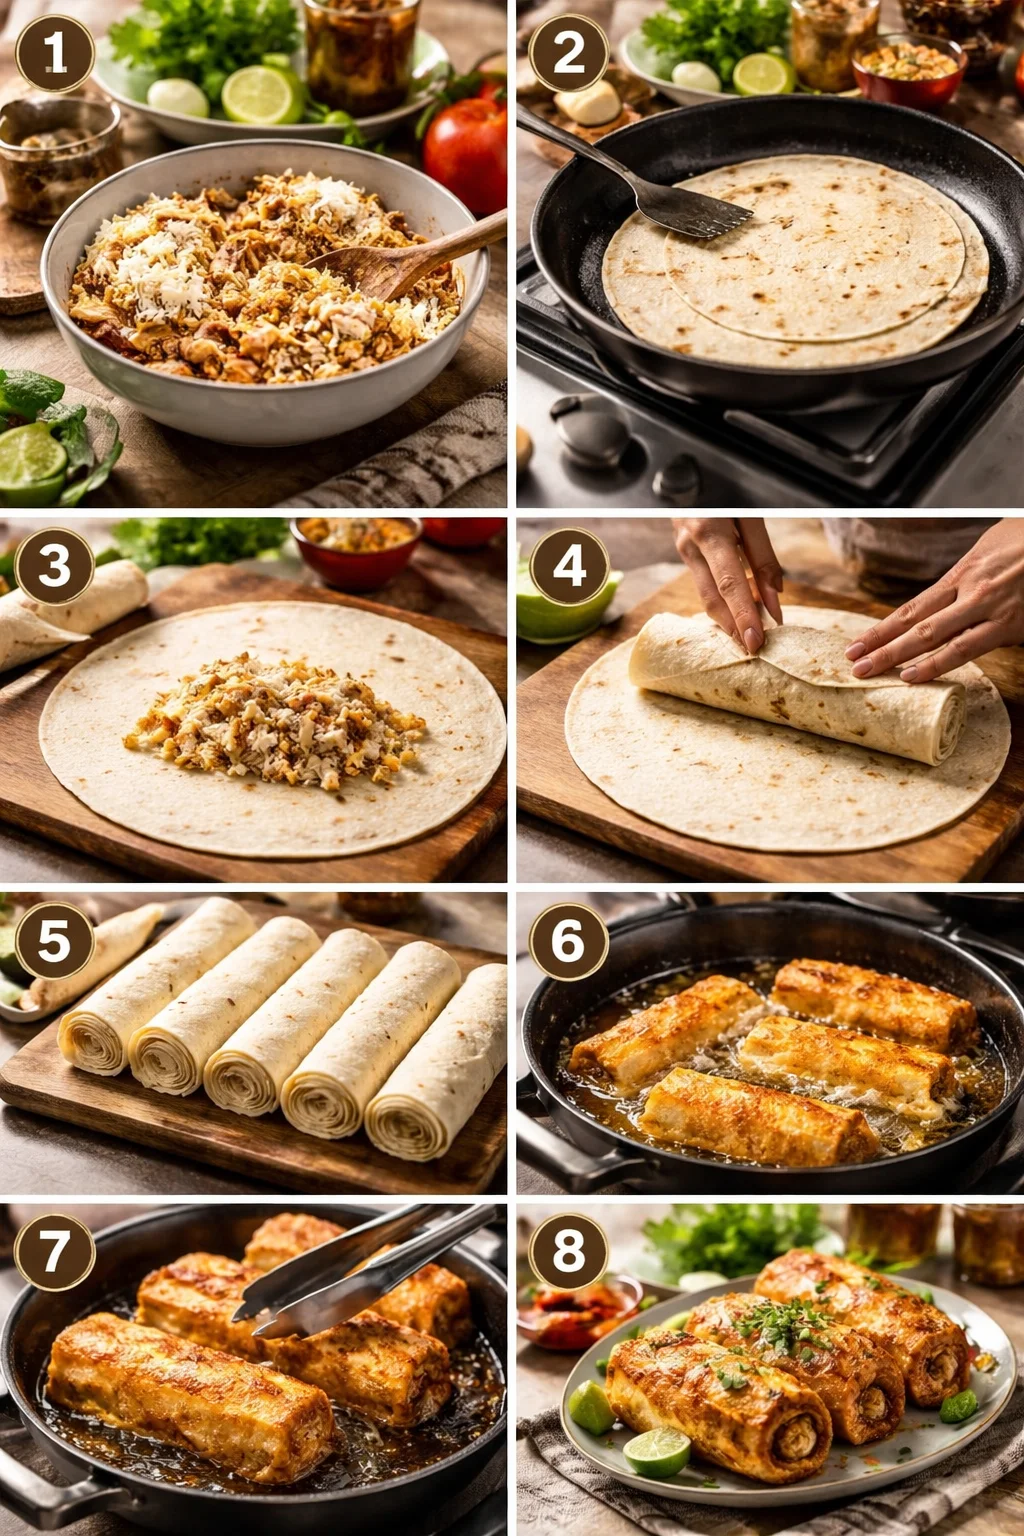
- In a bowl, mix shredded chicken, cream cheese (or sour cream), salsa, seasonings, and a handful of shredded cheese.
- Warm your tortillas for about 10 to 15 seconds in the microwave so they roll without cracking.
- Spoon filling down the center, fold in the sides, then roll tight like a burrito. Place seam side down.
- To fry: heat oil in a pan to medium or medium high. Fry seam side down first, then flip until golden and crisp.
- To bake: brush or spray all sides with oil, bake at 425 F until crisp, flipping once. It usually takes about 15 to 20 minutes depending on your oven.
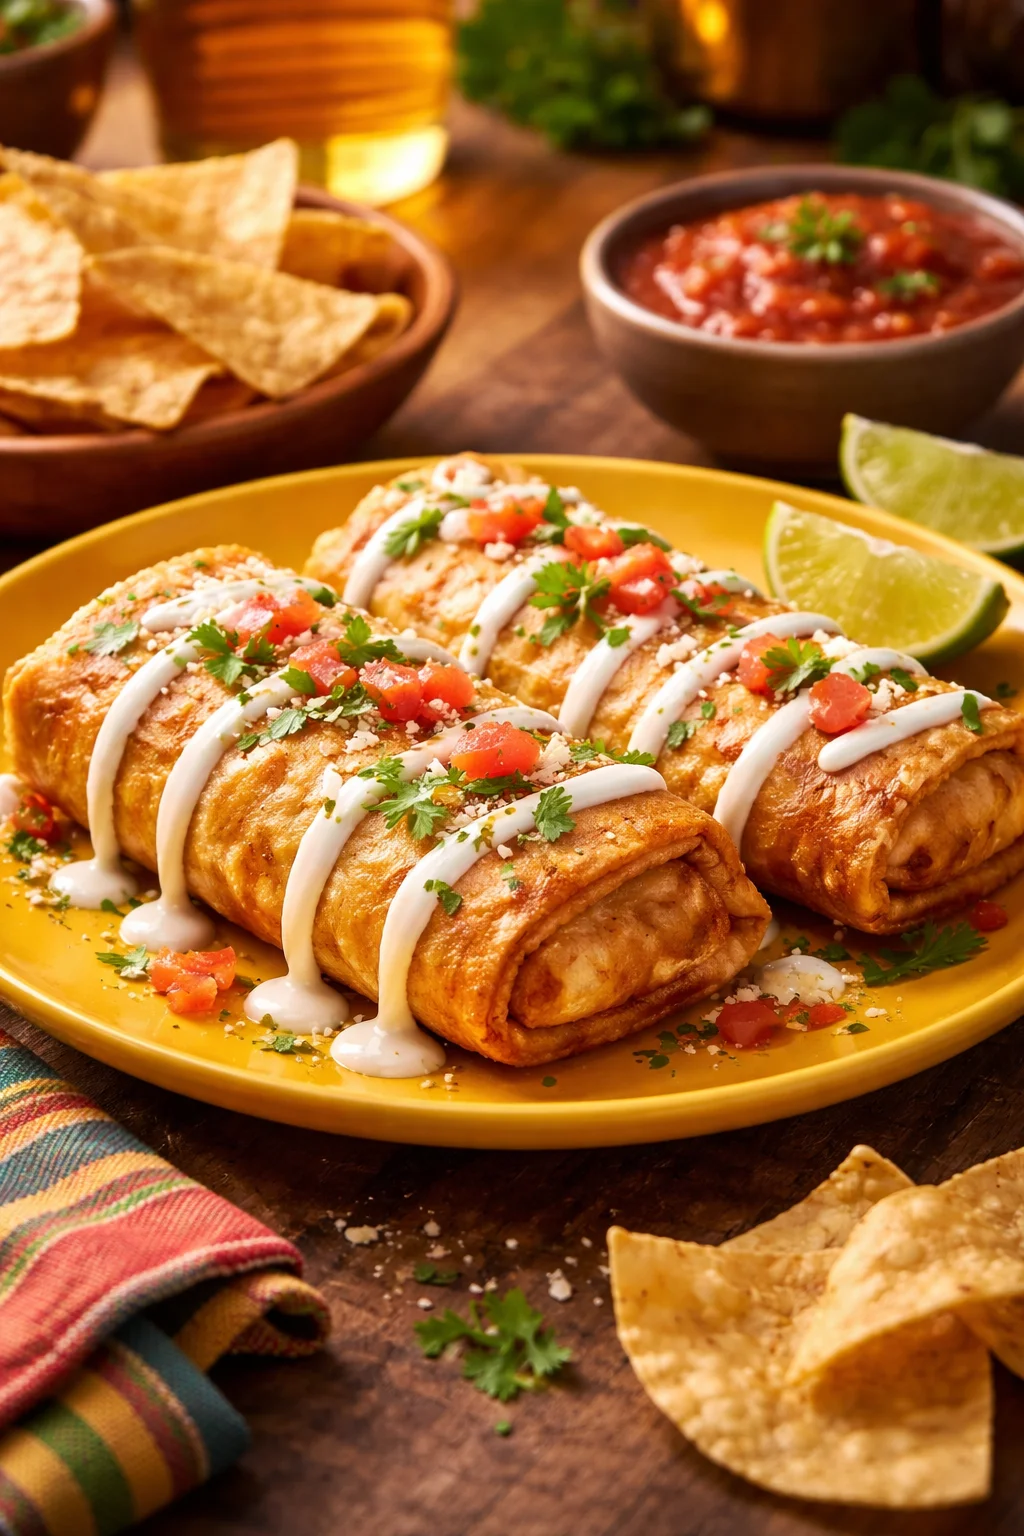
I usually serve Chicken chimichangas with salsa, sour cream, and whatever I have for toppings. Some nights I make quick rice, some nights it is just a big salad and I call it a win.
“I made these for my family and everyone went quiet for the first few bites. That never happens at my house. Crispy outside, creamy inside, and not greasy at all.”
When I am craving a different chicken dinner that still feels comforting, I also make buffalo chicken bowls because they are fast and super filling, but chimichangas definitely win for crunch.
Tips for the Best Homemade Chicken Chimichangas
These are the little things that keep your chimichangas from falling apart or turning soggy. I learned some of these the hard way, like the time I overfilled one and it burst open like a tragic cheese volcano.
My best real life tips
Do not overfill. It is tempting, I know. But a slightly smaller amount rolls tighter and fries cleaner.
Warm the tortillas. Cold tortillas crack, and cracks let oil in and filling out.
Keep the filling thick. If it looks runny, add more shredded chicken or cheese. A thick filling stays put.
Seal them seam side down first. Whether baking or frying, start seam side down so it holds together.
Drain on a rack if you can. Paper towels work, but a rack keeps the bottom crisp.
Also, if you are feeding a group, you can prep the rolled chimichangas ahead of time and keep them covered in the fridge for a few hours. Then crisp them up right before serving. That is my favorite party trick because it makes dinner feel easy.
And if you like comfort food casseroles, you might also enjoy chicken taco casserole on a different night. It has similar flavors, less rolling, and it is great for leftovers.
Common Questions
Can I bake Chicken chimichangas instead of frying?
Yes. Brush or spray the tortillas with oil and bake at high heat. You will still get a nice crisp outside, just a little lighter than frying.
What is the best chicken to use?
Rotisserie chicken is the easiest. If you are cooking from scratch, shredded cooked chicken breast or thighs both work. Thighs taste a bit richer.
How do I keep them from opening?
Roll them tight, do not overfill, and start cooking seam side down. You can also secure with a toothpick for frying, just remember to remove it.
Can I make them ahead and freeze them?
Yes. Roll them, then freeze on a tray. Once solid, store in a freezer bag. Bake from frozen at 400 to 425 F until hot and crisp, flipping once.
What toppings go best?
Sour cream, guacamole, salsa, shredded lettuce, pico de gallo, and a squeeze of lime. Even a little hot sauce is great.
A crispy dinner you will want on repeat
If you have been wanting a fun, crunchy dinner that is not complicated, Chicken chimichangas are it. Keep the filling thick, roll them tight, and pick your cooking method based on your mood. If you want to compare versions, I found helpful ideas from The BEST Chicken Chimichangas – Tastes Better From Scratch and also this solid guide from Homemade Chicken Chimichangas – Cooking Classy. Make a batch, set out toppings, and let everyone build their own plate. Once you hear that first crunch, you will get why I keep coming back to these.

Chicken Chimichangas
Ingredients
Method
- In a bowl, mix shredded chicken, cream cheese (or sour cream), salsa, seasonings, and a handful of shredded cheese.
- Warm your tortillas for about 10 to 15 seconds in the microwave so they roll without cracking.
- Spoon filling down the center, fold in the sides, then roll tight like a burrito. Place seam side down.
- To fry: heat oil in a pan to medium or medium-high. Fry seam side down first, then flip until golden and crisp.
- To bake: brush or spray all sides with oil, bake at 425 F until crisp, flipping once (about 15 to 20 minutes depending on your oven).