
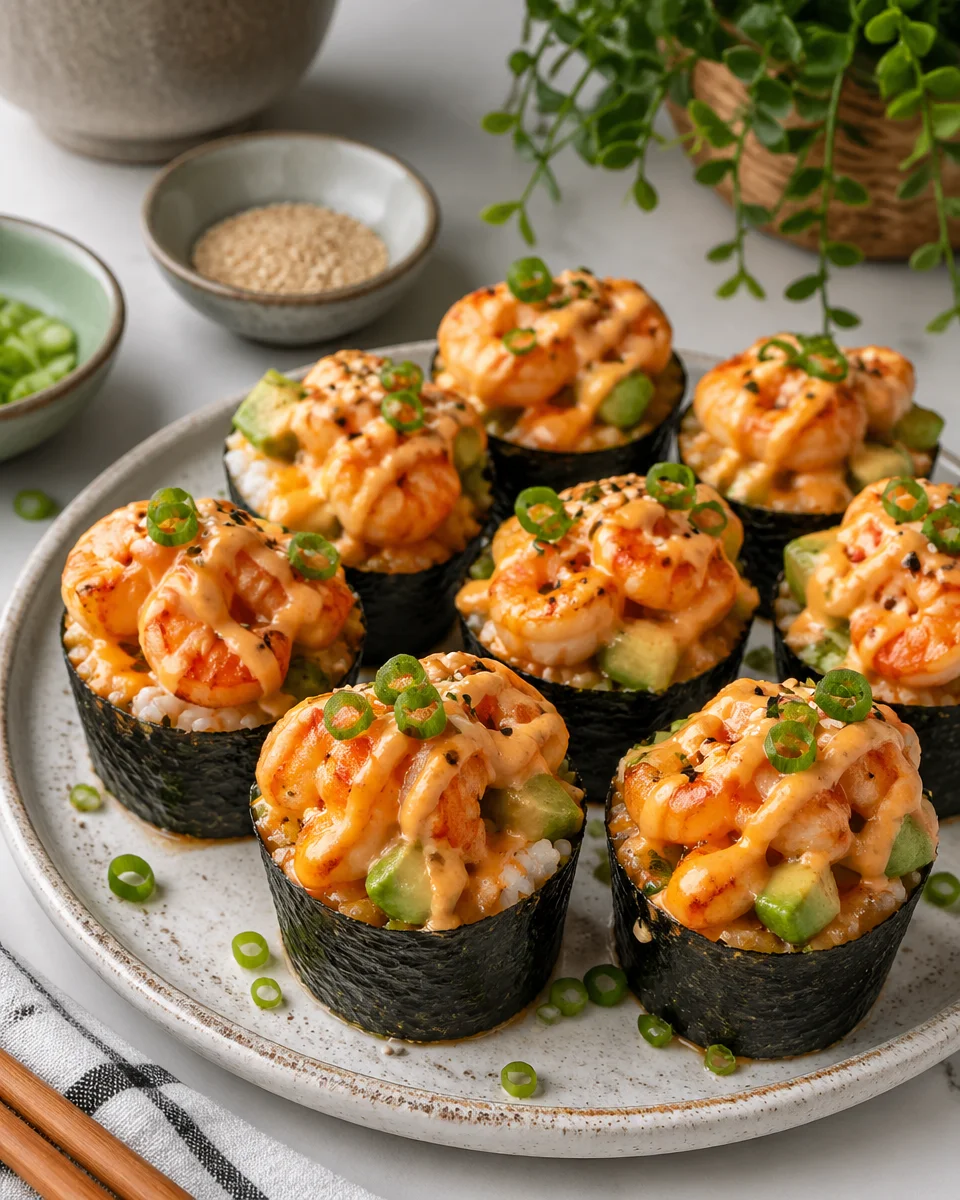
Baked Shrimp Sushi Cups are my go to move when I want sushi vibes at home but I do not want the whole rolling, slicing, and stressing situation. If you have ever stared at a pack of nori and thought, nope, same. These little cups are warm, a bit creamy, a bit spicy, and somehow still taste bright and fresh once you add toppings. I started making them for movie nights, and now my friends ask for them like it is a standing order. The best part is you can prep a lot of it ahead, then bake and eat while everything is still hot and cozy.
Why You’ll Love This Recipe
First, they are simple. You press seasoned rice into a muffin pan, fill it with shrimp and a creamy mix, bake, and then finish with fun toppings. It feels fancy, but it is not fussy.
Second, they are a crowd pleaser. People love the “everyone gets their own” vibe. No fighting over the last piece, and it is easy to grab and snack.
Third, Baked Shrimp Sushi Cups are super flexible. You can go mild, spicy, extra crunchy, or more classic with soy sauce and sesame. I even make a mini tray for kids with zero heat and extra avocado.
And if you are in an appetizer phase lately, you might also like this baked snack situation: baked salami appetizer recipe. It is another one of those “set it out and watch it disappear” foods.
I made these for my sister’s game night and everyone kept asking what restaurant they were from. The best compliment was my picky nephew asking for seconds. I used your tip to add cucumber on top and it totally worked.
Ingredients You’ll Need
I am going to keep this realistic. No weird ingredients you will use once and forget. Here is what you need for Baked Shrimp Sushi Cups, plus a few optional extras that make them feel really special.
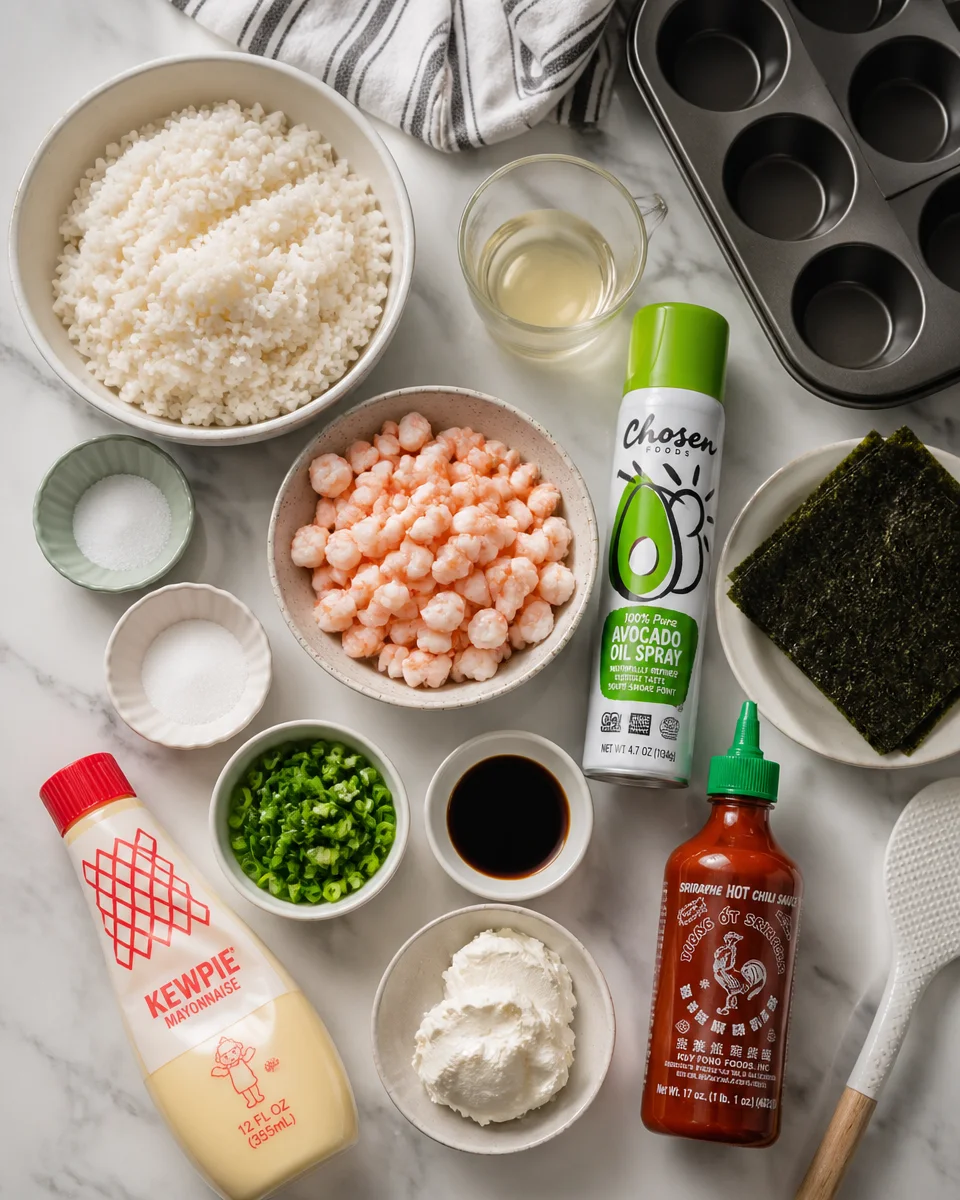
The basics for the rice cups
- Sushi rice or any short grain rice (medium grain works too in a pinch)
- Rice vinegar
- Sugar
- Salt
- Nori sheets (for the classic sushi flavor, optional but recommended)
- Cooking spray or a little oil for the muffin pan
The shrimp filling
- Cooked shrimp, chopped (you can use fresh cooked, or thawed frozen shrimp)
- Kewpie mayo if you have it, or regular mayo
- Cream cheese, softened (this makes it extra creamy)
- Sriracha or chili garlic sauce (optional)
- Soy sauce
- Green onions, sliced
And for toppings, use whatever makes you happy. I usually do diced cucumber, avocado, sesame seeds, extra green onions, a drizzle of spicy mayo, and sometimes a little sweet soy glaze. If you like shrimp in general and want another quick method, this one is worth bookmarking: crispy garlic butter air fryer shrimp.
How to Make Sushi Cups
This is the part where you realize it is basically “assemble and bake.” You do not need special tools, just a muffin tin and a spoon. I like a standard 12 cup pan, but a mini muffin pan also works if you want party bites.
Step by step, no stress
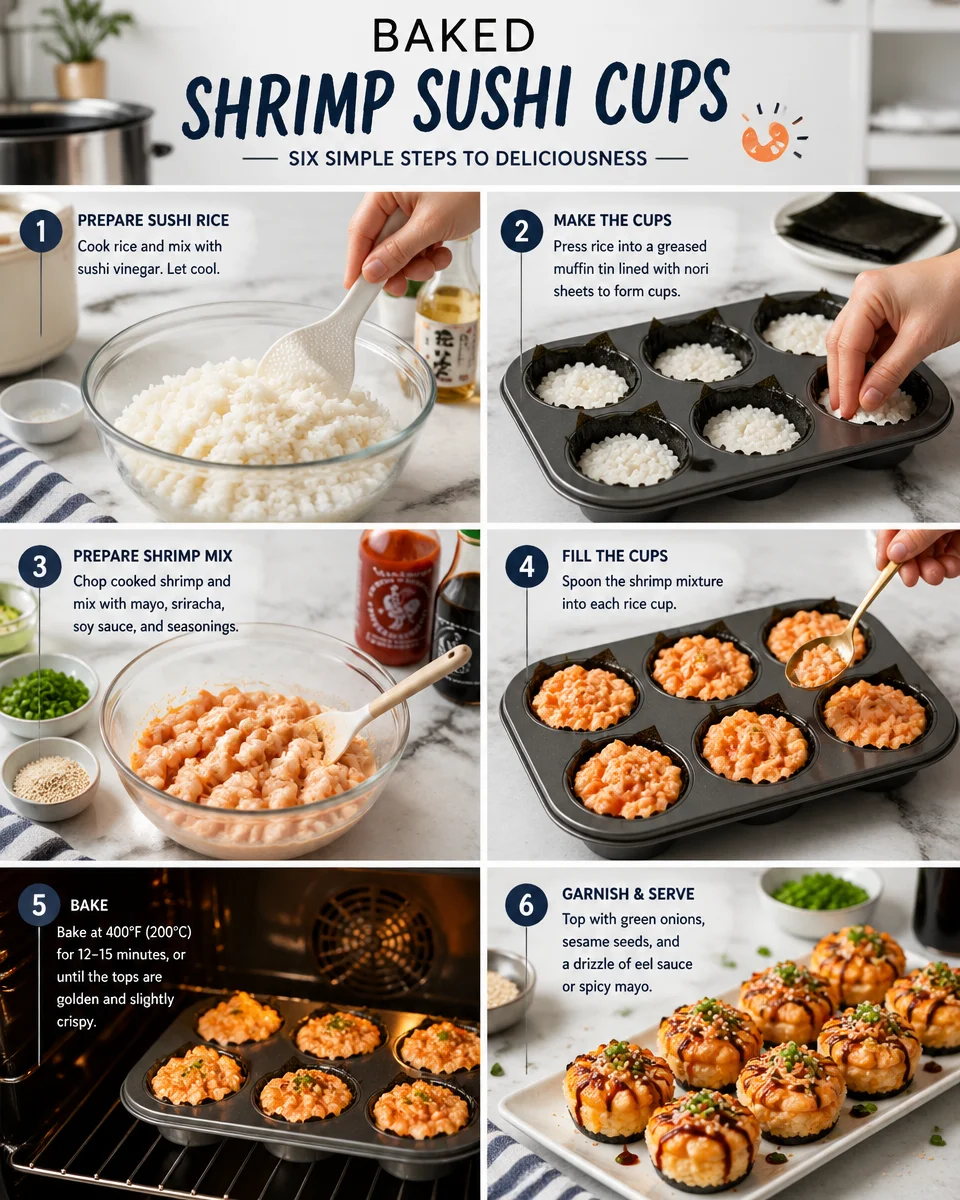
1) Cook and season the rice. Cook sushi rice according to the package. While it is still warm, mix rice vinegar, sugar, and salt, then fold it into the rice. Let it cool just a bit so it is easier to handle.
2) Prep your muffin pan. Spray the pan well. Trust me. Rice loves to stick. If you are using nori, cut it into small squares and press one into each cup. It does not have to be perfect. It bakes up fine.
3) Form the rice cups. Scoop rice into each muffin cup and press it down and up the sides to create a little bowl shape. Wet your fingers or the back of a spoon to keep the rice from sticking to you more than it sticks to the pan.
4) Mix the shrimp filling. In a bowl, mix chopped shrimp, mayo, cream cheese, soy sauce, sriracha (if using), and green onions. Taste it. Adjust it. If you want more heat, add more sriracha. If you want it saltier, a tiny splash more soy sauce.
5) Fill and bake. Spoon the shrimp mixture into each rice cup. Bake at 400 F for about 10 to 12 minutes, just until everything is hot and the tops look slightly golden.
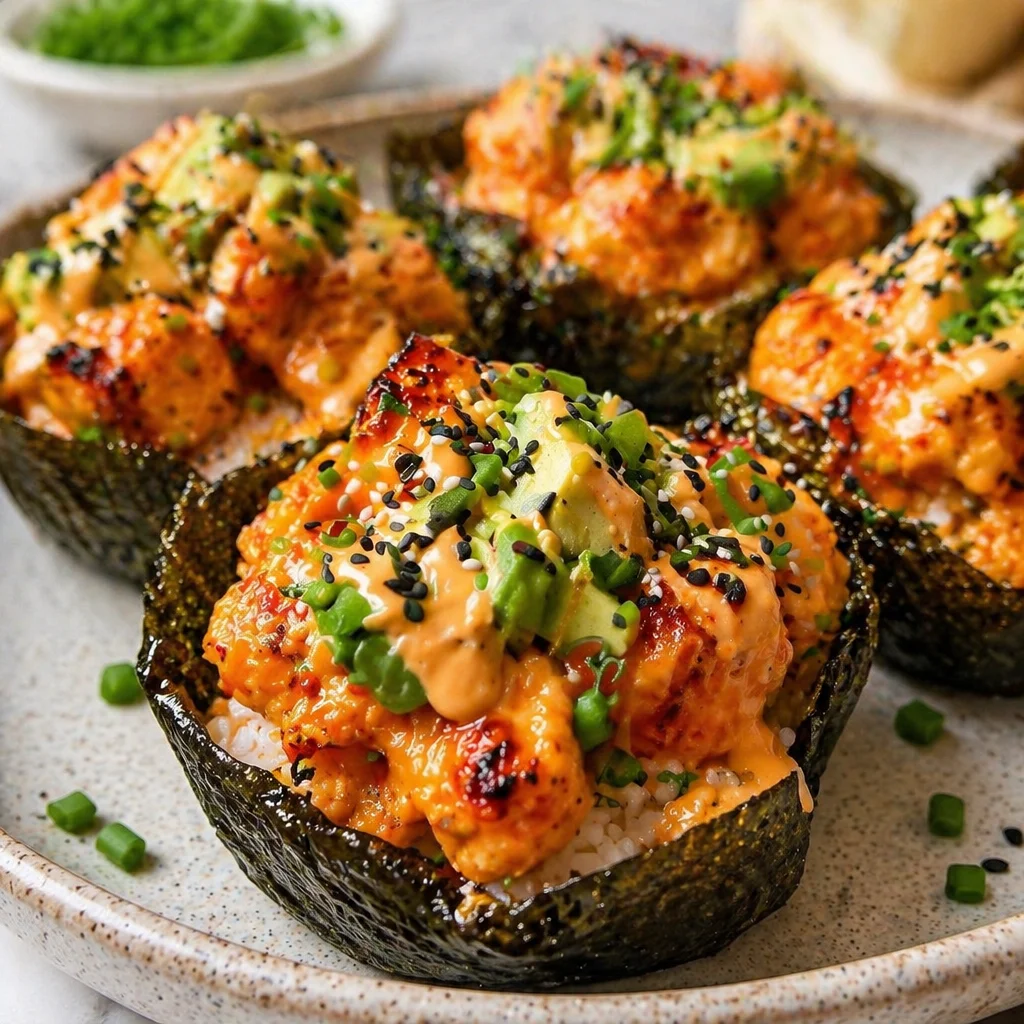
6) Cool briefly, then top. Let them sit for a few minutes so they firm up. Then add toppings like cucumber, avocado, sesame seeds, or a drizzle of spicy mayo. This is where the magic happens.
These are also awesome next to something warm and comforting if you are doing a casual dinner spread. I love pairing them with a cozy bowl, like this crab and shrimp seafood bisque when I want to go full seafood night.
Variations and Substitutions
This recipe is forgiving, which is one of the reasons I keep coming back to it. Here are a few easy swaps that still give you that satisfying “sushi bake” flavor in cup form.
Make it spicy tuna style: Swap shrimp for canned tuna (drained well) and keep the mayo and sriracha. You can add a little sesame oil too.
Use crab instead of shrimp: Imitation crab works and it is budget friendly. Real crab is amazing if you are feeling fancy.
No cream cheese: Use all mayo instead, or try plain Greek yogurt for a lighter vibe. It will be tangier but still good.
Lower carb option: Use cauliflower rice, but just know it will not hold a “cup” shape as firmly. I have done it pressed into silicone muffin cups and it helps.
Gluten free: Use tamari instead of soy sauce, and double check your sauces.
If you are putting together a whole baked snack table, you could add something sweet and cozy on the side later, like banana pudding cups. It is a fun contrast after the savory bites.
Also, if you are making these for someone who is nervous about raw fish, this is exactly why Baked Shrimp Sushi Cups are so great. Everything is cooked, warm, and super approachable.
Pro Tips for Perfect Sushi Cups
These are the little things I learned after making them a bunch of times and yes, after a few sticky muffin pan disasters.
Pack the rice firmly. If the rice is loosely packed, the cups fall apart when you try to lift them out. Press it like you mean it, especially around the edges.
Grease the pan well. I know I said it already, but it is worth repeating. Use spray, oil, or even a thin swipe of mayo in each cup. That last one sounds weird but works.
Cool them for a few minutes. Right out of the oven, they are soft. Give them 3 to 5 minutes so they set up and release more cleanly.
Chop shrimp small. Big chunks make the filling mound unevenly and can topple. Smaller pieces mix better with the creamy base and scoop neatly.
Finish with fresh toppings. Warm baked filling plus cool cucumber and avocado is the whole point. It makes them taste balanced instead of heavy.
One more thing, if you are making Baked Shrimp Sushi Cups for a party, I recommend doubling the batch. People always eat more than you think because they are small and snacky.
Common Questions
Can I make these ahead of time?
Yes. You can cook and season the rice, mix the shrimp filling, and store both in the fridge. Assemble and bake when you are ready. For best texture, do not assemble the rice cups too far ahead or they can dry out.
What kind of shrimp should I use?
Any cooked shrimp works. I like medium shrimp, peeled and deveined. If you are starting with raw shrimp, just cook it first by sautéing or boiling, then chop.
Do I have to use nori?
No, but it adds that real sushi taste. If you skip it, add a tiny sprinkle of furikake on top after baking, if you have it.
How do I store leftovers?
Store them in an airtight container in the fridge for up to 2 days. Reheat in the oven or air fryer so the rice crisps a bit again. Add fresh toppings after reheating, not before.
Why are my cups sticking to the pan?
Usually it is not enough grease or you tried to remove them too soon. Grease generously and let them cool a few minutes. A butter knife around the edge helps too.
A cozy little send off (and a nudge to try them)
If you have been craving sushi but want something easy, warm, and honestly kind of addictive, make a batch of Baked Shrimp Sushi Cups this week. They hit that sweet spot between comfort food and fun party snack, and you can dress them up with whatever toppings you love. If you want to compare methods and get more inspiration, I also enjoyed reading Easy Baked Sushi Cups (with Shrimp) – What Great Grandma Ate and Shrimp Sushi Cups – The Modern Nonna. Now go grab that muffin pan, and do not be surprised when everyone asks you to make them again.

Baked Shrimp Sushi Cups
Ingredients
Method
- Cook sushi rice according to package instructions.
- While warm, mix rice vinegar, sugar, and salt into the rice. Let it cool slightly.
- Spray the muffin pan with cooking spray or oil. Cut nori into small squares and press into each cup if using.
- Scoop rice into each muffin cup and press down to form a bowl shape. Wet fingers or spoon to prevent sticking.
- In a bowl, mix chopped shrimp, mayo, cream cheese, soy sauce, sriracha (if using), and green onions. Adjust seasonings as desired.
- Fill each rice cup with the shrimp mixture.
- Bake at 400°F (200°C) for 10 to 12 minutes until hot and tops are golden.
- Cool briefly for a few minutes before adding toppings.